How to Start a Blog in 2025
Starting a blog is exciting, but can feel overwhelming at the same time! Here are my step by step instructions for how to start a blog in 2025.

I’ve included a table of contents for you, in case you’d like to skip ahead!
Why Start a Blog
Blogging is a great way to express yourself. Whatever your passion is, you can have a blog where you can share your thoughts about it!
Think of it as your home on the internet. It’s your own space that you’ve carved out, where people can come and visit you.
It’s NOT social media, so you own it, and have complete control over it.
You can blog as a hobby, or you can make an income from it. A blog is your own business, and working for yourself is a great step toward simplifying your life.
Most of what I’ll be sharing in this post is with the assumption that you want to blog for money.
What Can You Blog About?
- What do you LOVE to talk about but your real-life friends & family are tired of hearing about?
- What do people constantly ask your advice about?
- What is your favourite hobby?
- Is there a certain type of account you love to follow on social media? (Homesteading, gardening, simple living, organizing, minimalism, etc).
- Are you really good at your job, but you’d love to retire and work for yourself instead? Blogging is a great way to share your expertise.
Blogging is a way to create long-form content (as opposed to short-form content like you’d find on social media), where you can share your passion with the world.
Even if it’s a passion that you make no money from in real life, you can monetize it with a blog if you wish!
Blogs are all about sharing information. Information that people are SEARCHING for online.
How to Start a Blog
There are a million resources on the internet about how to start a blog. If you type ‘how to start a blog’ into Google, there is no shortage of information about how to do this!
However, the reason you’re here, reading THIS particular blog post, is probably because you relate to me in some way.
When I first started thinking about starting a blog, I didn’t go to random people on the internet to learn how to do it. I sought out the people whom I already felt connected to.
Other homesteaders who had similar passions as I did. Homeschooling moms. Homemakers. People who were into simple, healthy living. Basically, people who were already living the lifestyle I wanted – I wanted to learn from them.
And that included how they created a blog from their hobby/passion. I wanted the nitty-gritty details on how they created a blog and a brand from scratch.
And that’s precisely the kind of info I want to share with you.
This post may contain affiliate links, which means if you make a purchase through one of these links, I make a small amount of commission at no extra cost to you. As an Amazon affiliate, I earn from qualifying purchases. See full disclosure here.
Select a Host
The very first step to setting up your blog is figuring out where to host it. A host is basically where your blog lives on the internet.
IF you are blogging with the intent of making money from it, you do NOT want a free blog (like Blogger, wordpress.com etc), and you do NOT want one of those all-in-one blogging platforms (like Squarespace, Wix) etc.
What you want is a self-hosted blog using WordPress.ORG.
When you use a free blogging platform, you don’t own your blog. The price you pay for free, is that someone else owns your content. In a flash, they could take your site down. You’ll also be limited in how you can earn an income from your blog, as you won’t be able to place ads.
With an all-in-one platform, like Squarespace, Wix etc, you’re paying extra money for them to take care of everything on the back end for you. You’ll also be limited in your earnings, because ad networks prefer self-hosted blogs. You are limited on what themes you can use, and you can’t change your host if you’re unhappy with your hosting. Because the platform IS the host.
All serious bloggers use WordPress.org.
To create a self-hosted blog using WordPress.org, you first need to select a host. When I first started my blog, I went with Bluehost, because it was the cheapest way to get started, and it seemed like the one that most bloggers recommended.
I signed up for the 3 year plan because that was the way to get the cheapest monthly rate. What I found was that I was having a lot of issues with my website going down, and the customer service was not great. I ended up very frustrated multiple times as I was trying to figure out issues on my blog.
After the initial 3 year period was up, my monthly rate jumped significantly (from $3.95/month to $15.95/month). At that point I decided to look for a new host. A lot of people seemed really happy with Bigscoots, so that’s who I went with.
And let me tell you, the difference between Bigscoots and Bluehost is night and day. I almost NEVER have issues with my website any more, and when I do, I get an instant response from Bigscoots and they fix it.
After this experience, I would never, ever go back to Bluehost.
What I discovered was that Bluehost has a very good affiliate program (One time someone signed up for Bluehost through my affiliate link and I earned over $100 from that one sale). So I think this is why so many people recommend it.
Bigscoots doesn’t have as great of an affiliate program (I’m now an affiliate for Bigscoots), BUT I can recommend them with a clear conscience because I am so happy with their service.
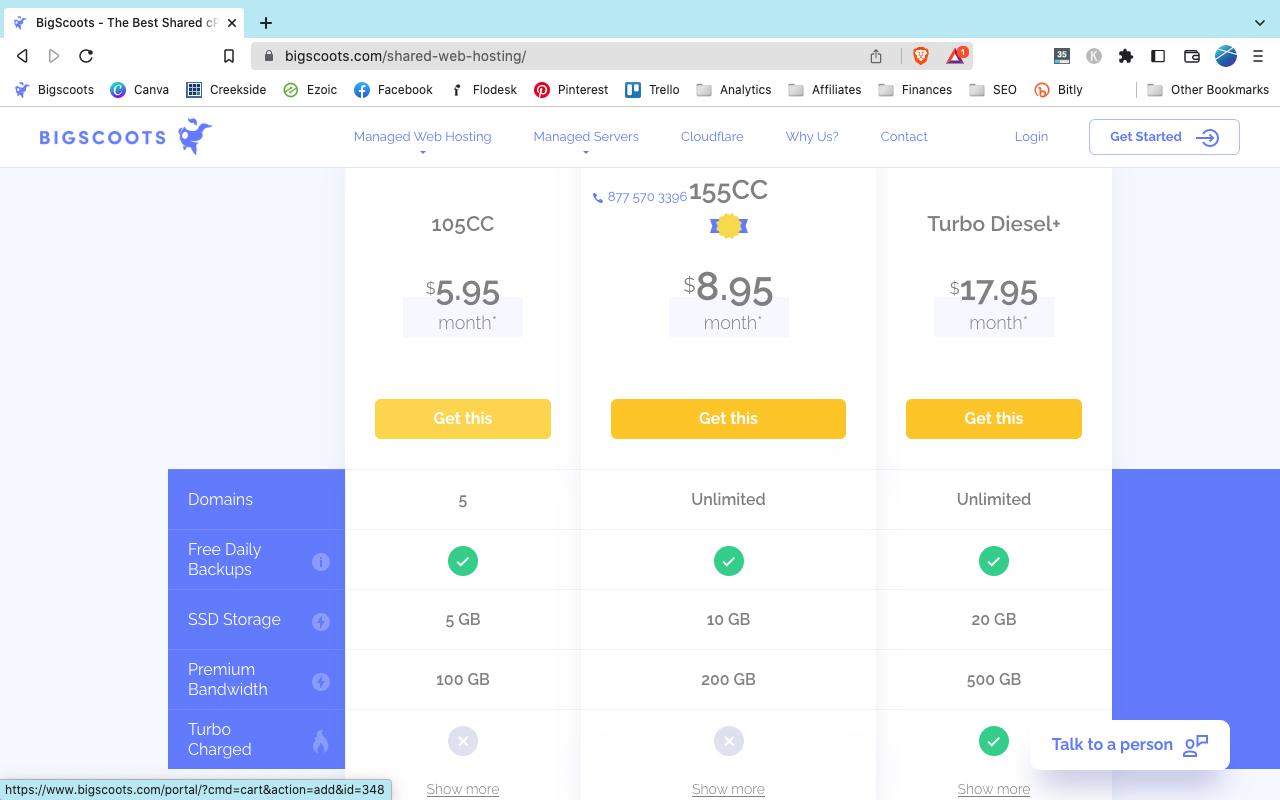
It’s not as cheap as the 3-year Bluehost plan, but it is much cheaper than what Bluehost jumps to after the first 3 years. AND you can choose to just pay month-to-month if you don’t want to pay for a year at a time (but paying for a year at a time does save you a little money).
I recommend starting with the Shared Hosting, which is $7.95/month (or $5.95/month if you pay for a full year up front). This is a very reasonable amount of money for having your own self-hosted blog. You can always upgrade to a better plan once you have lots of traffic and you are earning income from your blog.
Choose a Domain Name
Once you have selected the $7.95 ($5.95) shared hosting, it will prompt you to choose a domain name. This is the hard part!
You can type various domain names into the search box and it will tell you if it’s available or not.
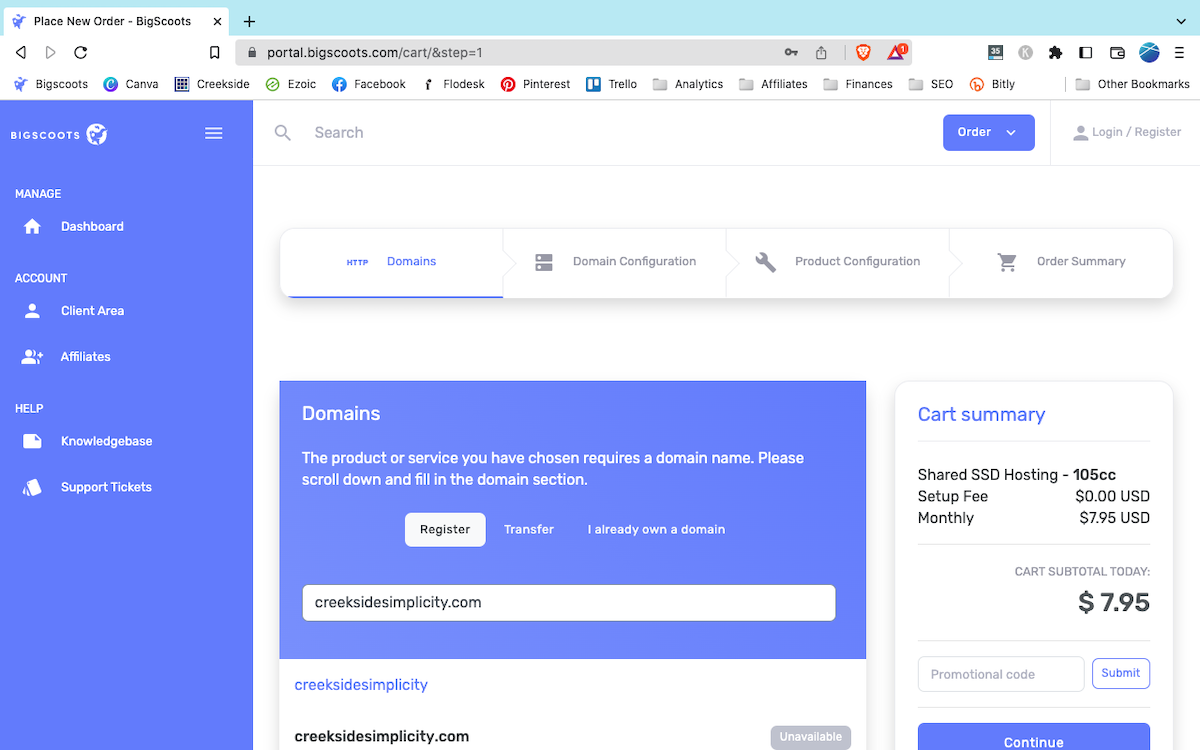
I recommend only choosing a .com domain. It’s the most recognized, and you won’t get confused with another website (ie – if the .com you want isn’t available, but the .net is, you don’t want the .net because you’ll always be confused with the .com version).
Keep searching until you come up with a .com you’re happy with that is available.
I recommend keeping your domain name short and sweet (2-3 words at most), easy to remember, and no strange spellings.
Choose wisely, because you don’t want to have to change your domain name down the road if you’re unhappy with it.
My old domain name was ‘Simple Life in the City’. Which was great, but when we moved to the country it no longer worked! It was a huge pain to change over. So try not to be so limiting with your blog name that it can’t evolve with you if your circumstances or interests change.
Once you find a domain name you’re happy with, you’ll need to purchase it. This will likely cost you somewhere between $10 and $30, depending on what you choose. This is an annual expense, so you’ll need to renew your domain name each year.
Install WordPress
You’ve selected your hosting plan and your domain name. Now it’s time to install WordPress! (Note that this is different than WordPress.COM. This is the WordPress software you’re installing on your self-hosted website).
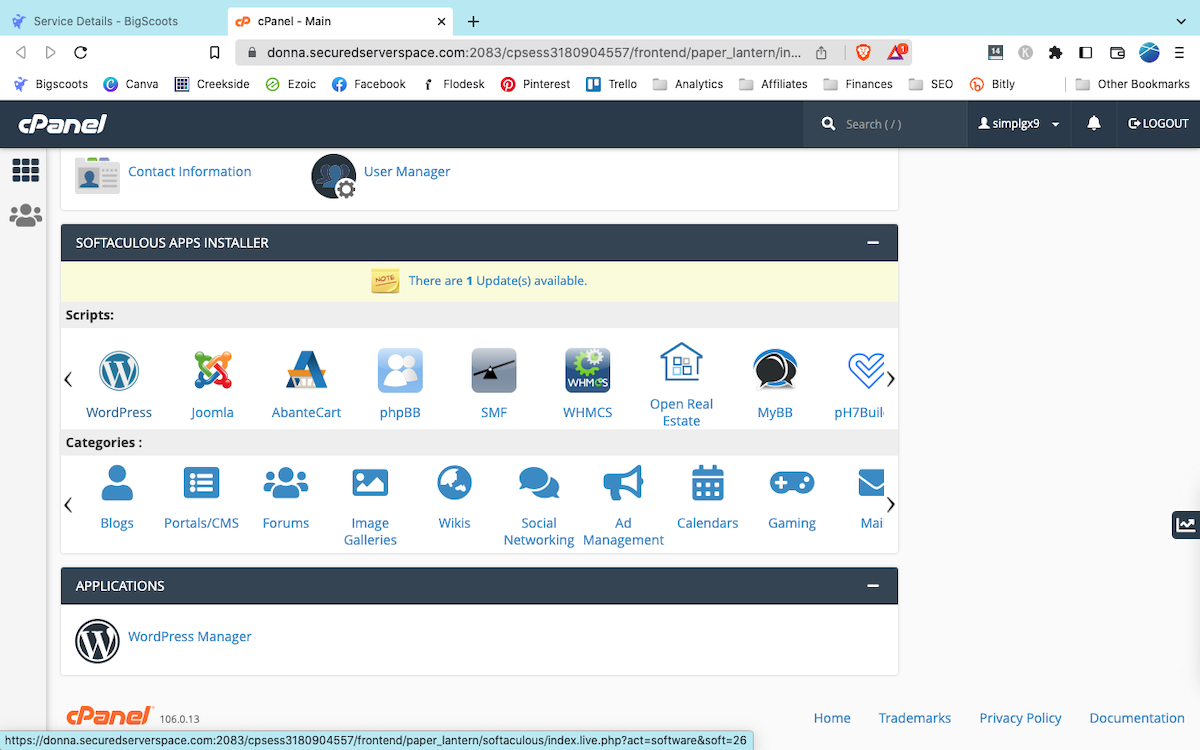
You’ll do this by clicking on Services, then Shared SSD Hosting, then clicking on your hosting plan. From there, you’ll want to click on Access Control Panel.
Once in your Control Panel, scroll down to Software and choose WordPress Manager. Then go ahead and install WordPress!
Log In to your Blog
Now comes the fun part – you get to log into your blog and start customizing it!
The way you log into your WordPress blog is by typing in your URL and adding /wp-admin to the end.
For instance, the login for my blog is www.creeksidesimplicity.com/wp-admin.
Here you will enter your credentials and get access to the back end of your website.
Install a Theme
Think of WordPress as the engine that runs your website, and the Theme as the paint job. The theme is what gives your blog a certain look and feel.
Unlike your domain name, your theme can be fairly easily changed at any point down the road, so don’t stress too much about choosing the PERFECT theme.
If you want to go with a free theme, I recommend Kadence. It’s light and fast, and very simple to customize.

If you want to invest in a paid theme, I use and love themes from Restored 316. They are absolutely beautiful, and come with top-notch support.
The theme I’m using on my blog is Create by Restored 316.
You definitely don’t have to invest in a paid theme right from the get-go, you can always start with the free Kadence theme, and upgrade to a paid theme later on.
(The Restored 316 themes run on Kadence, so if you decide to upgrade later it won’t be too difficult to do!).
Install Plugins
Plug-ins are like little add-on pieces of software that add extra features to your website.
You don’t want to go crazy with plug-ins, because they can slow your website down if you have too many.
But there are a few that I consider indispensable, and I’ll tell you what they are. (They’re all free!).
Kadence Starter Templates
Kadence Starter Templates give you full access to pre-made website designs using the WordPress block builder.
Kadence Blocks
Kadence Blocks adds custom blocks and options to extend Gutenberg’s editing capabilities. Kadence Blocks is your toolkit that makes the WordPress block editor capable of creating beautiful content that’s usually only possible through page builder plugins.
Akismet Anti-Spam
Once you have a corner of the internet, the spam bots will show up in full force! This plug-in automatically screens for spam comments and moves them into a separate folder for you to review (or not). If you don’t review them, they’ll eventually all get deleted. I check mine once in awhile to make sure it’s not catching real comments, but 99.999% of the time, they’re all spam.
Wordfence
Wordfence is a plugin that protects you from attacks on your website. Any time it sees suspicious activity, it will send you an email. It blocks cyberattacks.
The last thing you want is for your website to get hacked.
Updraft Plus
Updraft Plus does automatic backups of your website on a regular basis. That way, if anything happens to your site, you will always have a backup. (Note that Bigscoots also does backups.
So Updraft is like a backup for your backup. When you’ve created a lot of content, this will give you peace of mind).
Yoast SEO
When it comes time to write posts, you will want to ensure they are optimized for SEO (Search Engine Optimization).
Yoast SEO is an indispensable plugin for this. You’ll have a red light, yellow light, or green light, depending on how well you’ve written your post. It will also tell you what things you need to do to your post to make it Google-friendly.
Header Footer Code Manager (HFCM)
Header Footer Code Manager will allow you to install code on your website without messing with your website’s actual code.
You’ll need this later when you install Google Analytics on your website, and also if you decide to use any pop-up email forms.
Grow Social by Mediavine
You’ll likely want some kind of social sharing plugin on your blog. This allows people to quickly and easily share your post to social media. It will also show how many times your blog post has been shared.
The plugin I use for this is Grow Social by Mediavine. There are several options to choose from, but this is the one I like best!
How to Install Plug-Ins
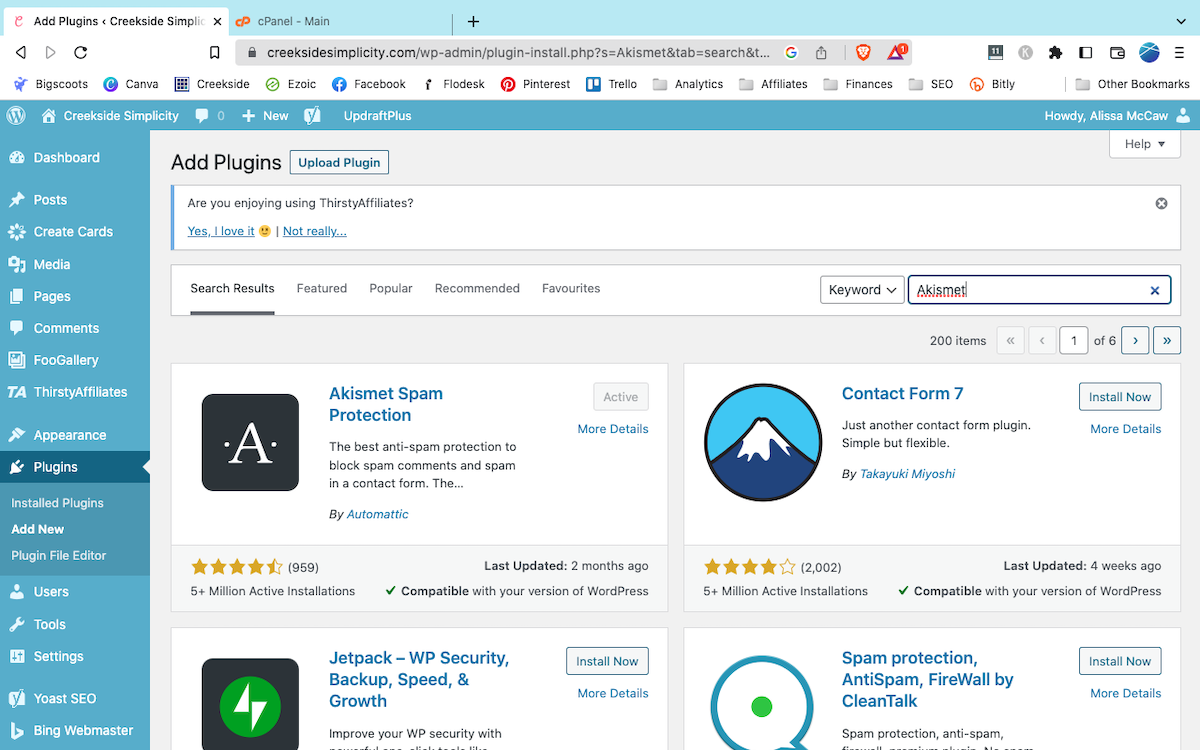
To install these plug-ins, you’re going to go back to your WordPress dashboard. (If you’re not logged in, remember it’s your URL followed by/wp-admin).
You’ll go to Plugins > Add New, and then search for, install, and activate each plug in one at a time.
Install Google Analytics
Google Analytics is a code you install on your website that allows you to track all kinds of data.
It tells you how many visitors you’ve had, what pages they visited, where they came from, and so much more.
This will be an important part of tracking your blogging progress.
It’s also important when it comes time to apply to ad networks, as ad networks use your Google Analytics data to track how many visitors your site has.
To install Google Analytics, use the setup assistant. This will guide you through the process.
Then you’ll receive a code which you’ll need to install on your website. Just copy and paste this code into the Header Footer Code Manager plugin that you installed when installing your Plugins.
Your website will start tracking visitors, which you can access when you login to Google Analytics. (I have the app on my phone so I can quickly check my stats any time).
Customize Your Website
So far, you’ve purchased your domain and hosting, installed WordPress, installed your Kadence theme and Plugins, and installed Google Analytics.
I bet you didn’t think you could build your own website! And here you are, halfway there.
This is where the fun part comes in. You get to play around with your website and get it exactly how you want it.
Select a Starter Template
When we installed plugins, you installed the Kadence Starter Templates plugin. Here’s where you’re going to use it.
Starter templates are just customized layouts for your website, so yours won’t look like everyone else’s! Think of it like a skin for your theme.
In the side menu of your WordPress dashboard, select Appearance > Kadence > Starter Templates.
(There may be another menu item that just says Starter Templates, don’t choose that one, make sure you choose the Kadence one).
Not all the starter templates are free. In the drop-down menu at the top, select Free Only.
Now scroll through and select the design that appeals to you the most, and that you feel would be the best fit for your website and brand. (Keep in mind that you can edit all the fonts and colors in the next step, so for this step you’re really only considering layout).
You can click on each one to scroll through and get a feel for how your site would look with that template.
To go back, you’ll have to use the back button, and then go back into Appearance > Kadence > Starter Templates to get back to where you were.
When you find the one you want, go ahead and click ‘Full Site’.
It will take a little while to install, and then you can view your website!
Customize Your Website
To customize your website, you can either click customize in the menu at the top, or go back into your dashboard and select Appearance > Customize, to customize the look and feel of your website.
This is where you get to choose your fonts, logo, colors, and so much more! I can’t give you a detailed tutorial here, but go ahead and click into each tab to see what it does.
This may take you some time, but try not to spend too long on this. The goal right now is to just get your website up and running. You can always come back and tweak things later.
You’ll also use the customization menu to edit your Menu. You can come back and edit these menu items once we’ve built out some additional pages.
Once you have all your customization settings selected, don’t forget to save them.
Build Your About Page
You have your homepage set up, now it’s time to create an About page.
When people visit your website, they’re going to be curious about who you are, and what you’re about. Use this page to share a little about you. Add a photo so they can connect with you!
For reference, here is my About page.
How to Create a New Page
When logged into your WordPress dashboard (yoururl.com/wp-admin), you’ll see a +New at the top of your dashboard. Click that and select Page.

You want to select Page, rather than Post.
Your About Page will be a page, not a post. Pages are your static foundational pages. Posts are what you can use to create content later on.
Collect Email Addresses
Having a blog is great, but there is no guarantee that if someone reads a blog post that they will ever come back!
Building an email list helps you keep in touch with your readers on a regular basis. You can email them when you have a new blog post, or just when you have something on your mind that you want to share with your audience.
You can join my email list if you want to see how this works. When you enter your name and email below, you’ll automatically be added to my Welcome sequence, which is how I introduce myself to my readers. A series of emails is automatically sent out when you join my email list.
Down the road, you may wish to monetize your blog by selling products. Your email list subscribers are your #1 fans, so your email list is the best place to sell products.
To collect email addresses and send out emails to your subscribers, you’ll need an Email Service Provider (ESP).
This is not your regular email client (like gmail etc), it’s a dedicated service that allows you to legally collect email addresses and send out marketing emails.
Flodesk
Flodesk is what I currently use and love. It’s also incredibly beautiful, and has tons of easy to customize templates. It’s pretty much a drag-and-drop email program.
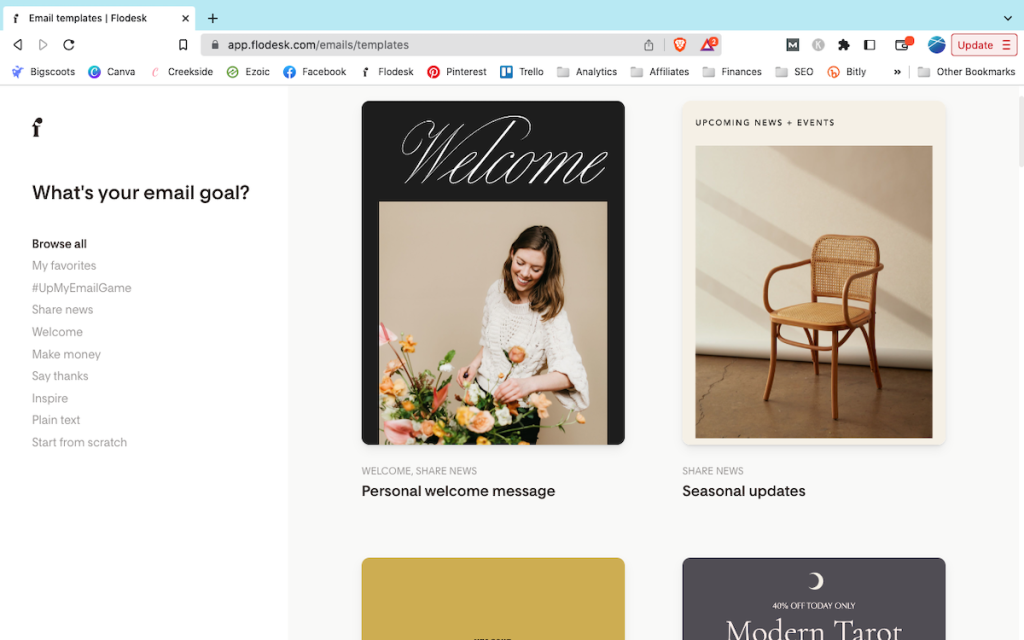
The other thing I love about Flodesk is you’re locked into one price forever. Your rate doesn’t increase as your subscribers increase. To my knowledge, this is the only email marketing platform that has a flat rate.
If you use my referral link, you can get a 30 day free trial so you can play around with it for free. If you decide to go with Flodesk you’ll get 50% off the flat rate pricing for the first year! Then after that it will switch to the regular flat rate. (The 50% off deal is only available through a referral link, so make sure you sign up through my link and not directly through the Flodesk website).
If you work hard, you should be able to start earning money from your blog within a year, which would help offset the increased cost of your email marketing.
You can choose to pay monthly or annually.
You could start out with Mailerlite and upgrade to Flodesk later.
Just keep in mind that if you do that, you’ll have to re-create all of your forms and your automated sequences. I personally didn’t want that hassle, so I chose to go with Flodesk right from the beginning.
Keyword Research
The biggest mistake I made when I first started blogging, is that I didn’t do any keyword research.
I just blogged about whatever I felt like!
This was fine, because initially I only blogged as a hobby. I hadn’t even considered the fact that I could be earning an income from blogging.
The problem with not doing keyword research, is you have no idea whether people are searching for the topic you’re writing about.
Without keyword research, the only people who were visiting my blog were friends and family! I’d post my blog posts on my personal Facebook page, and a few curious people would click over and read.
In order to drive traffic to your blog, keyword research is a MUST!
There are a couple of ways I do this:
Keywords Everywhere
Keywords Everywhere is a simple Google Chrome extension that helps you see search volume. Meaning if you search for something in Google, it tells you how many people are searching for that keyword each month.
Keywords Everywhere is priced based on credits. I pay $10 a year for credits. It gives me something like 100,000 credits which is far more than I need.
Moz
Moz is a tool that tells you the Domain Authority of the websites that show up in search results. Domain Authority is a number that is generated based on how old your blog is, how consistently you post content, and how many backlinks you have (backlinks are when other websites link back to your blog).
Moz is a free extension. I use it in conjunction with Keysearch so I can see how tough my competition is for a particular keyword. If all the results on page 1 of Google have a Domain Authority of 30 or more, I usually won’t bother writing on that keyword, because I know I will not be able to beat those websites.
If there are a couple of websites on Page 1 with a DA of 20 or less, then I consider that keyword worth writing about.
Rank IQ
This is a little more advanced, so feel free to disregard this for now – but if you want to write great content right from the get-go, with the best possible chance of your posts getting ranked by Google, Rank IQ can help with that.
Rank IQ is a great tool that helps you write content that is more likely to be ranked by Google. I draft all my blog posts in Rank IQ, and then copy/paste them into WordPress.
Rank IQ will suggest keywords to use throughout your post that are words Google is looking for within your specific topic. If you use enough of the suggested keywords, you’ll get an A+ ranking.
Once I reach an A+ in Rank IQ, I go ahead and copy/paste my post into WordPress. Then I add my images, links etc right in WordPress.
I have noticed a big improvement in how quickly my posts rank in Google since using Rank IQ. I have also gone back and revised my older blog posts to improve their rankings.
Write Blog Posts
This is the whole reason you’re here, right? To write blog posts!
Now that all your hard work for setting up your blog is done, it’s time to write!
Simply click on New Post and start writing.
Now, I could easily write a whole other blog post on how to write a blog post. There are entire websites dedicated to this. But I’ll at least share a few tips to help you get started.
Headings
A blog post should have logical headings. The title of your blog is your H1 heading. This is what will appear at the top of your post, and in Google search results. You should only have one H1 heading in your post (and it will automatically be an H1, you won’t have to select it).
You’ll want to use H2 headings for your topics. Use your H2 headings to outline your post. Think of all the topics you want to cover in your post and make H2 headings for each of them.
H3 headings are your sub-headings. These will be nested under your H2 headings.
Everything else will be paragraphs. Paragraphs in blogging are not like paragraphs in essays. You want to keep them short. People tend to scan blog posts, so they won’t have the attention span to read a wall of text.
In a blog post, you usually want to aim for 1-3 sentences per paragraph.
Images
Most people are visual, and want to see images of what you’re talking about. You want a reasonable number of images to match up with the length of your blog post.
If at all possible, I recommend taking and using your own photographs. If this isn’t possible, or doesn’t work with your niche, you can use stock photos. But they tend to be less personal than using your own photos.
There are SEO (Search Engine Optimization) strategies you can use with photos to help them show up in google image search results. This is beyond the scope of this post, but this is just to say that images are an important part of your blog posts.
Links
Links are a very important part of blogging and SEO. Within your blog posts, you want to have internal links as well as external links.
Internal links are simply links to other parts of your website. Whether it’s other posts or pages. This might be difficult if you have a brand new blog, as you won’t have much to link to yet!
I recommend starting off by writing Topic Clusters. These are a group of blog posts that are all related to one another and would fall under a single category (ie – gardening).
You might start with a pillar post (ie – Gardening tips for beginners), that has several topic headings within that post.
You could then write additional blog posts that expand on each of those headings.
Then under each of those headings in your pillar post, you could link out to the related blog posts. Each of your blog posts would also link back to your pillar post.
This creates GREAT SEO juice. Google loves topic clusters because it shows them that you are an authority on a particular topic.
Once you have 5-10 posts written in a certain topic cluster, you can move on to another topic and do the same thing.
Before long, you’ll have a great repertoire of blog posts that you can interlink.
External links are also important. You want to be linking out to other websites throughout your post.
Some of those external links can be ‘no-follow’ affiliate links (ie – if you become an Amazon affiliate, and you’re recommending a product, you can link to your Amazon affiliate link).
But some of those links should also be non-affiliate, or ‘do-follow’ links. A great tip is to link out to a high authority website (known as Domain Authority) at least once in your post.
Once your post is written, edited, has images and links, you can go ahead and hit publish! This puts your blog post out on the internet where people can search for it.
Promote Your Blog Posts
Once your post is written, you want to help people find it! There are several ways to do this.
Google Search Console
The first thing I do after publishing a new blog post, is go to Google Search Console and tell Google to index my post. What this does is if someone types the topic of your blog post into Google, your blog post will be one of the search results that appears.
(Initially, you will be WAY down in search results. But if you use good keywords and optimize your post for SEO, you will eventually move up in the rankings).
Google will probably eventually crawl your post anyway – but in my experience this takes much longer. If I submit it directly, it’s usually live within 24 hours or less.
Social Media
Social media is a great way to promote your blog! If your blog is brand new, you don’t have any readers yet. Posting your new blog post on social media means you can get some readers right away!
You might already have some personal account profiles on social media. Definitely use these to get started.
But to be more professional, you’ll want to create a page/profile that’s specifically for your blog. This is where you’ll share out all of your blog posts, and anything that’s related to your blog. You’ll want to encourage your personal followers to follow your new accounts.
Don’t go too crazy with social media in the beginning. Choose only 1-2 platforms to focus on. I personally use Instagram and Facebook.
Facebook allows me to share links to my blog posts directly onto my Facebook page.
Instagram doesn’t allow linking on posts, so this is where I share day-to-day, more candid shots and thoughts, etc.
Instagram can also be linked to your Facebook page, so that anything you post on Instagram will automatically share to your Facebook page as well. I use this feature as it saves me a lot of time!
I do have a TikTok account, but to be honest I rarely use it. It’s just not a place I hang out, so I don’t think of it much. I mostly just re-post any reels that I’ve made for Instagram. Repurposing content is a great way to save time while having greater reach.
Pinterest is a HUGE component of blogging. Almost all successful bloggers know how to use Pinterest to their advantage.
Basically how it works is, for each blog post you write, you want to create a minimum of ONE Pinterest pin to go with the post. (I prefer to make 5-10).
You’ll then upload that pin to Pinterest, along with a description and keywords. Pinterest is a search engine, so if someone searches for your blog topic and your pin comes up, they can click on your pin and it will take them directly to your blog post!
The majority of my blog traffic comes from Pinterest, with Google in 2nd place, and social media in last place.
Like most things I’m sharing with you, there are entire courses and websites dedicated to how to use Pinterest to grow your blog.
When you’re ready to dive in to this topic, I recommend a course called Pinteresting Strategies. This is the course I took in the very beginning, and it has been hugely helpful!
Remember when I mentioned the importance of an email list?
Your email list is where all your raving fans live. These are people who liked your post so much, they signed up to be on your email list so they could hear from you again.
Don’t neglect your email list!
I recommend sending out one email per week. This works out perfectly if you’re also publishing one blog post per week. You can also include links to previous blog posts (particularly if they’re related to your latest blog post).
SEO
SEO stands for Search Engine Optimization, and will be the #1 skill you’ll want to learn if you decide to take your blog seriously. I’m definitely not an SEO expert, and this is a huge topic, but here are a few tips to help make sure your posts are optimized for Google:
- Make sure your topic is clearly stated in your title and in your headings
- Use the Yoast SEO plugin and achieve a green light (this is not perfect but definitely helps)
- Have both internal and external links throughout your post (both affiliate and non-affiliate links)
- Use images with keywords in the image title
- Make sure your post is long enough – aim for at least 1000 words
For an in-depth beginners course on SEO, I highly recommend Easy On-Page SEO by Debbie Gartner. This was the course I took to help me understand all the ins and outs of SEO.
Or if you’re not quite ready for a paid course just yet, she does have a free mini course as well.
How to Earn Money from Your Blog
I’ve mentioned a couple of times in this post that you can earn an income from blogging. And you may be wondering… how?? How can I possibly earn money from typing words on the internet??
If you are creative-minded, your options for earning an income on the internet are unlimited! But I’ll share a few ideas with you below:
Affiliate Marketing
Affiliate marketing is the easiest way to start monetizing your blog. If you mention a product or a service, get yourself an affiliate link and use it. That way, if anyone clicks on your link and makes a purchase, you’ll get a small credit for it. Over time, those small amounts add up!
A simple affiliate to start with is Amazon. You’ll be able to get an affiliate account right away, but you need to make 3 sales in a 3 month period in order to keep your account. So make sure you’re promoting those posts!
Anything you personally use and love is a great option for an affiliate. For instance, in this post you’re reading, most of the links are affiliate links. These are all products I personally use and can recommend.
I’d suggest only being an affiliate for products you use and love – this will ensure you build trust with your audience.
Advertising
Putting ads on your blog is a great way to earn passive income. People don’t have to click links or make purchases in order for you to earn an income from ads.
When you get traffic to your blog, and ads appear as people are scrolling your post, you automatically get paid.
Not everyone loves the look of ads on their blog, so this may or may not be for you. But if you think of it as you are creating free, helpful content for your readers, ads are a way they can still get that content for free, while you are compensated for your time and work.
Most ad networks have a minimum amount of traffic you need to have before you can be approved. Some ad networks have a higher threshold than others. The 2 main premium ad networks need 50,000 to 100,000 sessions a month to qualify. For most bloggers, this is a big goal.
But you can start with a much smaller ad network. I use Grow by Mediavine. It’s free to sign up, and they will usually accept fairly new blogs with just a few thousand sessions per month.
I don’t recommend Google Adsense. It literally pays pennies, and it will slow your site down significantly. Plus. if you accidentally break the terms and conditions of Adsense, you will not be able to sign up for any other ad networks, as they all require you to be in good standing with Adsense. That’s not a risk I’d be willing to take!
Network Marketing
I actually had my Network Marketing business before I started my blog.
A network marketing business is similar to Affiliate Marketing, except you own your business.
When most people think of Network Marketing businesses, they think of companies like Avon, Mary Kay, and Tupperware. These were all early pioneers in the Network Marketing industry.
It’s direct sales, where the company handles the inventory, shipping products etc, but you are supporting your customers directly.
Network marketing sales were historically done belly-to-belly: Where you meet with people in person to share the benefits of your product or service and help them make a purchase.
Having a blog takes this to a whole other level. Now you have access to customers from all over the world, who are searching the internet for your product. You no longer have to waste time hosting parties or arranging in person meetings.
With a blog, you can share the benefits of your products online, and create a funnel for your qualified buyers.
Since very few network marketers have a blog, this will help you stand out and give you credibility!
I LOVE my essential oils business, but all the in-person classes I was teaching were taking a lot of time away from my family and my homestead. Since I have shifted to sharing essential oils online, it has been a game-changer.
Network Marketing can be very lucrative. It does take a little more time and effort than affiliate marketing, but for many bloggers it earns them more income than all their other blogging income combined.
Your Own Products
You can create your own products and sell them to earn an income online.
Whether you choose physical products (like handmade goods, or a paper planner), or digital products (like eBooks), you can make a decent income selling products from your blog.
I plan to create more digital products in the future, but right now the only digital products I sell are Trello templates, and I have made a few sales through my blog.
I sell my Trello Templates through Flodesk Checkout.
If you choose to go with Flodesk for your email marketing, they have a cool Checkout option that allows you to create beautiful sales pages and a checkout page. It integrates with your email marketing so you’ll be able to send automated emails to your new customer with a download link for the product they purchased.
With Flodesk Checkout, you can make sales while you sleep! (And I usually do – it’s so fun to wake up in the morning with an email from Flodesk congratulating me on making a sale!).
Multiple Streams of Income
As you can see, there are many ways to earn an income from your blog. And I’ve only touched on the tip of the iceberg.
Most bloggers I know don’t rely on a single income source.
Multiple streams of income are key if you want to make an income from blogging. That way if one income source drops off, you have many others to fill the gaps.
Most bloggers are affiliates for multiple products – so you can still create multiple streams of income if you’re just doing affiliates. Just choose multiple companies to be an affiliate for.
Consistency Pays Off
I hope this post has given you some guidance on how to start a blog.
Blogging is hard work, but it’s definitely worth it!
The biggest key when it comes to blogging is CONSISTENCY.
Choose a publishing schedule and stick to it! The more blog posts you have floating around on the internet, the higher your traffic will be. This means increased ad revenue, as well as more people clicking on your affiliate links and making purchases.
I personally strive to publish one new blog post per week. If I’m being honest, that doesn’t always happen. Sometimes, during busy seasons, it’s one post per month. But I definitely see the most growth when I’m consistent.
Some bloggers prefer to post 2 blog posts per week. That would get you 100 posts in a year, which greatly increases your chances of getting good blog traffic.
I knew right from the beginning that I couldn’t commit to 2 a week, but I could commit to 1. Figure out what works with your life and schedule, and stick with it.
How to Start a Blog Course
While I truly believe anyone can start a blog, regardless of your skill level in technology, sometimes you need a little more hand-holding.
As I mentioned earlier, when I first started my blog in 2015, it was really more. of a hobby. I wasn’t even thinking of monetizing my blog at that point (I didn’t even know that was an option), so I had zero strategy when it came to blogging.
A few years later, I decided to start taking this blogging thing more seriously.
One of my favourite bloggers, Lisa Bass from Farmhouse on Boone, was offering a blogging course.
In this course, she really holds your hand, and takes you through the process of setting up your blog, step-by-step.
It’s all in video format, so it’s really helpful for those of you who are audio/visual learners.
I learned a TON from this course. While I completely understand that not everyone can afford to invest in a course up front, and it is possible to start a blog without taking a course – it was a worth-while investment for me because it saved me a ton of time vs. trying to find information from scattered places all over the internet.
If you’re considering taking a course, I highly recommend this one – and I’d love if you’d use my affiliate link!
It’s called Create Your Blog Dream.
I still refer back to it frequently when I need a refresher!


Blogging Resources
Check out my Blogging Resources page, where I list in detail, all of the courses, tools, and equipment I use to run my blog.
Pin It for Later


Thanks… so helpful!
You’re very welcome! Good luck with your blog. 🙂