Grow a Thriving Vegetable Garden Without Getting Overwhelmed
Sometimes, growing a vegetable garden can feel overwhelming. We already have busy lives, with so much to do – how are we supposed to fit in taking care of a garden on top of that? Here are some of my tips and tricks to help you grow a thriving garden, without getting overwhelmed.

This post may contain affiliate links, which means if you make a purchase through one of these links, I make a small amount of commission at no extra cost to you. As an Amazon affiliate, I earn from qualifying purchases. See full disclosure here.
I was diagnosed with ADHD less than a year ago – at the age of 46!
I’ve always struggled with procrastination, starting tasks but not completing them, and feeling so completely overwhelmed by what needed to get done that I would just avoid it altogether.
Needless to say, that’s not the best strategy if you want to grow your own food!
Over the years (long before I knew I had ADHD – I just thought I lacked the drive and motivation that other people had to complete tasks), I developed plenty of coping mechanisms. Because, let’s face it – we all have to adult, regardless of how hard it is.
I’ve developed lots of strategies to help me stay somewhat on track, or at least not let anything serious slip through the cracks.
My homemaking routines strategy has been a huge help with making household chores less overwhelming, and I’ve developed similar strategies for keeping up with the gardens.
Even if you don’t have ADHD, I’m sure you can relate to feeling overwhelmed when it comes to growing a vegetable garden.
I thought I’d share with you some tips and strategies I’ve been applying to my gardening routine.
Obviously, take what works for you and leave the rest!
But when you’re done reading, I’d love if you’d leave a comment and let me know what strategies you use to help reduce your garden overwhelm. That way we can help each other!
1. Do Your Morning Routine First
First things first: Always start with your morning routine.
I can’t tell you how many times I’ve wandered out to the garden early in the morning, in my pyjamas, coffee in hand, just to take a peek at how things were going.
4 hours later, I’d be weeding, planting, watering, and suddenly realizing I was starving, and still in my pyjamas…
By the time I came back inside, it was noon, my bed still wasn’t made, my kitchen was a mess, and I felt like my day was turned upside down.
I find gardening time to be much more enjoyable if I do my morning routine first:
- Get dressed & brush my teeth
- Make my bed
- Start a load of laundry (that way, I can get it on the clothesline while I’m outside)
- Make breakfast
- Tidy up the kitchen
- Prep supper (or at least make a plan for supper)
Then, when I go out to the garden, I’m not stressing about the state of the inside of the house, and I have a plan for what I’m making for dinner (especially if anything needs to be defrosted).
Even better is when I throw something in the crock pot before I head outside – then dinner is basically cooking itself while I’m in the garden!
2. Start Small
If you haven’t started your vegetable garden yet, my biggest piece of advice is to start small.
You can always expand your garden later – but if you’re new to gardening, starting with a huge vegetable garden is a guaranteed way to feel completely overwhelmed.
In the beginning, you’re still learning. Every task requires brain power, because you’ve never done it before.
- How far apart do you plant each plant?
- How can I tell what is a weed when I’m weeding?
- What can I plant together?
- What do I start from seed vs with plants?
- How often should I water?
In the beginning, everything is more time-consuming, because you’re learning as you go. During this stage, I recommend keeping your garden really small. Like one raised bed. Grow a few things you enjoy eating.
I highly recommend Square Foot Gardening (which is the method I started with 20 years ago, and still use to this day!). I talk a little more about it below, but with Square Foot Gardening, you can just plant a different thing in each square foot of your garden.
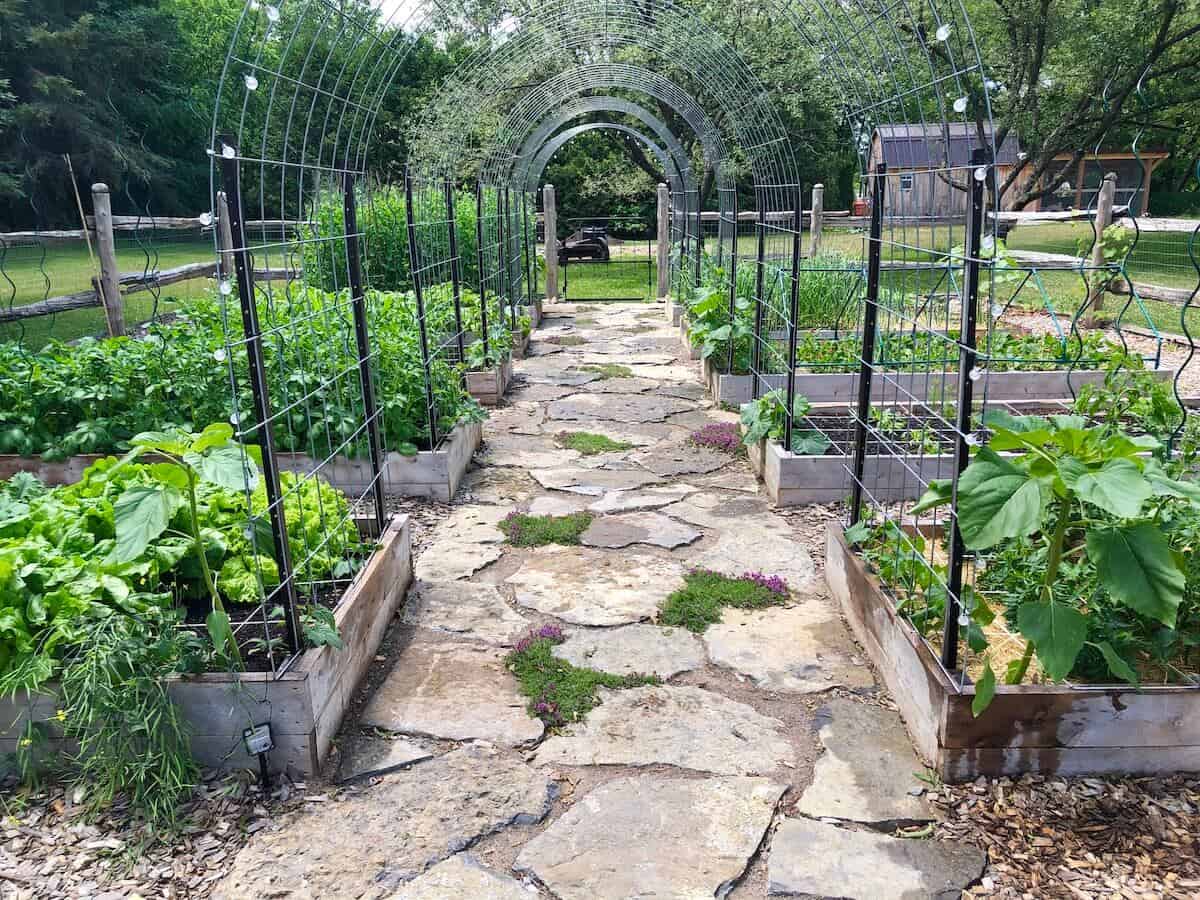
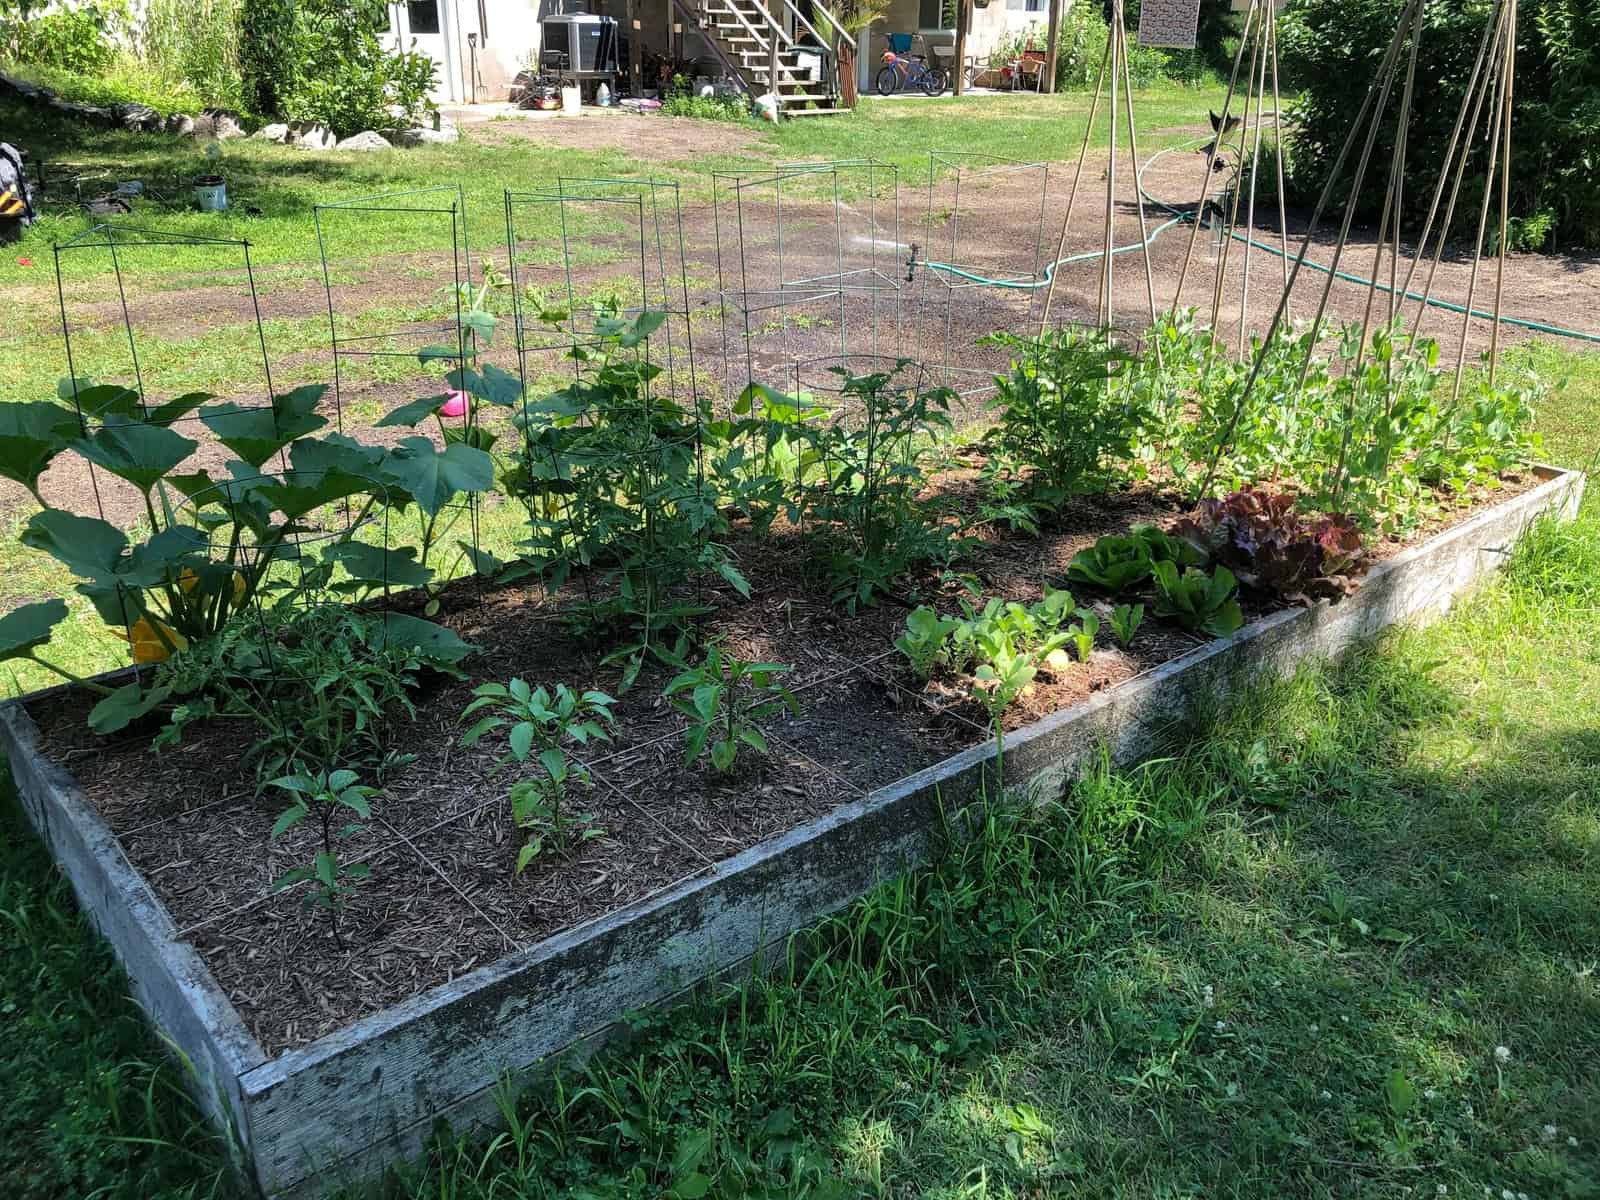
3. Use Raised Beds
Overall, I find raised beds so much easier to maintain than in-ground gardens.
For the most part, I only have perennials in my in-ground gardens. All my annual vegetables are in raised beds.
In particular, I use the Square Foot Gardening method.

Some of the benefits of Square Foot Gardening are:
- Less weeds
- Intensive planting means you have a smaller area to maintain (you’re not watering and weeding pathways, because there aren’t any!).
- Raised beds are easier on your body because you don’t have to bend over as far
- I have a garden stool/cart that I can sit on, listen to my YouTube videos/podcasts, and work away in the garden.
- I can focus on just one bed at a time. An in-ground garden sort of feels like one huge garden (even if it’s divided into rows). Where with raised beds, I can choose one to focus on, and ignore all the rest! It’s like they don’t even exist.
- Square Foot Gardening removes a lot of the thinking & decision-making parts of gardening – it tells you exactly what kind of soil to add to your beds, when to plant each vegetable, and how many of each plant per square foot.
With Square Foot Gardening, you can even take it a step further. Instead of focusing on an entire bed, you can just focus on one square.

The idea behind square foot gardening, is that you can plant something different in each square.
If you start with a single, 4×4 raised garden bed, that gives you 16 square feet of garden space.
In each square foot, you can plant:
- 4 lettuce plants
- One tomato plant (grown vertically)
- One pepper plant
- 16 carrots
- 16 radishes
- 9 beets
- 9 onions
- 9 spinach
- 9 bean plants
And that only used 9 out of your 16 squares!
You can see how much you can actually grow in a small space using Square Foot Gardening. By planting a variety of different plants, you get to learn about each one, but on a much smaller scale.
In the future, you can add more raised beds as your confidence grows, and you get to know how much of each item you’d like to grow.
4. Set a Timer
My favorite motto is “I can do anything for 15 minutes”!
When I feel overwhelmed by everything that needs to be done in the garden, I set a 15 minute timer on my Apple Watch, and just pick something – anything – to work on.
I’m always amazed by how much I can get done in just 15 minutes.
Usually what happens is the timer goes off, but by then I’m on a roll and I just keep going. The timer just gives me the momentum I need to start.
I always give myself permission to quit after 15 minutes if I want to, but I rarely do.
Even better is when I involve the kids. I have 3 teenagers, so if we all work for 15 minutes, that’s the equivalent of me working for an hour by myself!
We frequently use this strategy for weeding. No one likes to weed, so if everyone knows they only have to do it for 15 minutes, they don’t complain too much. Each person just picks a different area and works on it for 15 minutes. It’s amazing how much we can get done!
If we do this every day for a week, that’s a cumulative total of 7 hours!
I’m always amazed by how much I can actually accomplish in 15 minutes – especially those tasks that I avoid because I think they’re going to take me hours.
5. Stop Comparing Your Garden to Others
As gardeners, we have a tendency to compare ourselves to other gardeners, don’t we?
We think that if our garden isn’t as beautiful, or as successful, we have failed.
That’s the worst possible thing we can do!
It’s fine to look to others for inspiration, but don’t let it become the thief of your joy.

As you work in your garden, try not to focus too much on whether it is beautiful, or magazine-worthy. Instead, think about how it nourishes your family, saves you money, and helps to connect you to the Earth, and the cycles of nature.
Having a garden is a gift in itself; so many people would love to have a garden, but live in an apartment, or in some other situation that doesn’t allow them to have one. (Although, I would argue, almost anyone can have some form of a garden!)
Take the time to truly appreciate the gift your garden is, regardless if it is Pinterest-worthy or not.
6. Progress, Not Perfection
Each time you go out to work in your garden, try not to focus on the big picture.
Yes, it’s important to have a plan initially, otherwise, your garden layout may be inefficient, or too shady, or get eaten by critters.
But, beyond that, I want you to celebrate each bit of progress you make.
Instead of feeling down at the end of the day because there is still so much to do, celebrate whatever it is you got done!

I love celebrating my small wins over on Instagram. Each little task I achieve in the garden, I love to post it. Not for accolades, but with the hope it will inspire others to do the same!
Did you get one bed weeded today? Celebrate!
Did you finally plant those onions (a month late, but better late than never?) – you should feel awesome about that!
If you have an Instagram account, come and follow me so I can celebrate your wins with you! (If you don’t, I highly recommend it! It’s so fun sharing your gardening with others, and you can surround yourself with a like-minded community).
7. It’s Ok to Cheat
Ok, let me explain.
Every year, I have big intentions of having the perfect garden.
Of starting my seeds indoors, exactly on time, and nurturing them into big, healthy plants.
But guess what? Sometimes it doesn’t work out.
Onions need to be started ridiculously early in order to have decent sized onions by harvest time here in Canada (I’m talking February). In February, my brain hasn’t quite switched into gardening mode yet. So I started them in March.
Well, by the time they needed to get planted out in the garden, they were far too spindly and weak.
I went to the garden centre, and bought some onion plants. It cost me about $30 to buy enough onion seedlings to fill my raised bed (In the end, I probably could have bought a bag of onions at the store and called it good – but that wasn’t the point).
If things don’t go as planned, just remember how lucky you are to have the option to simply go to the garden centre and buy your seedlings!
Starting your own plants from seed is ideal, but planting store-bought seedlings in your garden is still a 100% acceptable form of gardening. No one will even know! And you can still go out and harvest juicy tomatoes from your back yard.

(my store-bought onion seedlings will still yield me 324 onions!)
8. Distract Yourself
Even when I know what needs to get done, sometimes my brain just won’t let me. I think too hard, I over-analyze everything, and end up avoiding the task.
One of my favorite techniques is to distract myself with YouTube videos, podcasts, or even chatting on the phone with a friend.
(This works best if you are a somewhat experienced gardener and don’t have to think too hard about what you’re doing).
My Air Pods are one of my most frequently used gardening tools!
Any time I come across a YouTube video I want to watch, I’ll add it to my ‘watch later’ list. (These are usually videos that don’t require me to actually watch them in order to get the information). Then when it’s time to garden, I put my Air Pods in, start the playlist, and get to work!
I find this especially effective if it’s videos related to gardening – I find it very motivating and inspiring.
One of my favorite gardening YouTube channels is Roots & Refuge.
My hands are busy with gardening, and my mind is entertained, and it’s like the gardening magically gets done without me even having to think about it.
9. Grow Something Beautiful
As much as I love to grow food, it all starts to look a little boring, especially before the tomatoes and peppers ripen to add a little pop of color.
Otherwise, the garden is a boring sea of green.
I love to grow one raised bed that is dedicated to cut flowers. Not only does it add a beautiful pop of color to the garden, it also attracts butterflies & pollinators, and I get the bonus of getting to keep fresh flowers on my kitchen table all summer!

Your veggie garden doesn’t have to be boring – what things can you bring into your garden that make it so you love to be there?
I also added a little table and chairs with a patio umbrella, so I can take breaks while I’m working.

We made a “food tunnel”, so our climbing plants could grow over our heads and make it easier to pick. Plus, it’s pretty darned magical walking through a tunnel of food!

What would bring your joy in your garden?
- Twinkle lights?
- Wind chimes?
- Pretty garden decor?
Try to think of how you can make your garden your sanctuary – a place you actually want to spend your time.
10. A Little Each Day

When I lived in town, I had a Gardening Day, which was the day I had set aside to get all our outdoor chores done. This was pretty easy on a tiny 1/8 acre lot with just 4 small raised beds!
Now that we live in the country, and I have a lot more gardens to take care of, a weekly gardening day is just not realistic or practical. Instead, I prefer to do a little gardening each day.
My preference is to get it done first thing in the morning – especially in the heat of the summer. But any time of day works; the main thing is just making an effort to get out there every day.
Some days I only manage 15 minutes, other days I’m out there for hours – it just depends on the weather, and how busy I am with other things.
The best part of doing a little gardening each day, is getting some vitamin D, having my hands in the soil, and feeling good about making a little progress every day.
11. Do “Just One Thing”
Some gardening tasks are on repeat (weeding, watering, harvesting), but others are things that actually allow you to make progress (planting!)
For these types of tasks, I often choose just one thing to focus on for the day.
For instance, when my onions needed to get planted, that was all I did that day.
Instead of going outside and feeling overwhelmed by all.the.things., I just focused on planting my onions. It took quite awhile, because there were so many to plant. I took a few breaks. But my only job that day was to get those onions planted.
At the end of the day, I felt a sense of accomplishment, because while weeding, watering, and harvesting never end, those onion seedlings only needed to get planted once. It was something I could check off my list and not think about again until next year!
12. Incorporate Permaculture Design Principles
An ounce of prevention is worth a pound of cure.
Benjamin franklin
Permaculture is basically a way of gardening that works with nature rather than against it. By incorporating some of these principles into your garden plan, you let nature do most of the work, which means there is less for you to do overall.
Here are some permaculture design principles for your vegetable garden:
Before Planning Your Garden, Start by Observing Your Land
- Plot the movement of the sun and see which directions the shadows fall
- Observe how water moves through your property. Are there natural swales? (these would help lower your watering needs). Are there low areas that flood in the spring? Can you capture and re-direct water to go where you need it?
Observe Nature
Take a walk in the woods, and observe how nature grows plants.
- Trees, shrubs, vines, and ground cover all co-exist.
- You don’t see bare soil – the ground is covered with a thick layer of natural mulch
- Nature doesn’t till (and neither should you)
- There are some plants that thrive in the shade, and others that thrive in full sun
- Nature doesn’t use pesticides or herbicides
Use your observations to help decide where your garden(s) should go. Some plants are happy with some shade (like herbs), others want full sun (like tomatoes & peppers).
Gardening Zones
I’ll talk more about this below, but the idea is that you want the gardens that need the most attention, or that get the most use, closest to your house. Then things that need less attention (ie, fruit trees, perennials, or one-harvest crops, further away from your house).
There are 5 Permaculture Zones (not including Zone 0):
Zone 0 is your house – this isn’t really a zone on its own, but you will base your other zones on where your house is.
Zone 1 is the area directly around your house, as well as the areas you might walk past multiple times a day. For instance, the path from your house to your chicken coop could be included in Zone 1, because you will see it at least twice a day.
Zone 1 is where you grow things that need consistent care, or that you harvest frequently. For instance, I keep all potted or container plants right on my deck, with a watering can next to them. Container plants require daily watering, so to make this as easy as possible, I want them literally right outside my door.
My herb garden is also in my Zone 1, because I frequently snip herbs as I’m cooking a meal, and I don’t want to walk far (or put shoes on) to do so).
In the winter, we store our firewood under our deck, right outside our patio door. I can go out in my slippers and grab firewood if needed.
Your kitchen/vegetable garden also belongs in your Zone 1. One of the biggest mistakes I see people make, is to plant their vegetable garden far away from your house. That makes it less likely you will visit your garden as frequently as you need to. “Out of sight, out of mind”.
Zone 2 is for things like your perennials (fruit trees, perennial vegetables, and one-harvest plants (think of larger crops like pumpkins, corn, squash, etc).
Zone 2 would also include things like your chicken coop, or your secondary firewood supply.
Zone 2 will frequently be heavily mulched, which helps retain moisture in the soil, eliminating the need for water, and helping to suppress weeds.
If you live in town, or on a small property (less than an acre), you mostly likely only have zones 1 & 2.
Zone 3 would be where you would graze larger animals, or grow large crops like grain, etc.
Zone 4 would be the edges of your property, where wild food grows that you don’t have to do anything to maintain (ie – here on our property, all our hedgerows grow wild black caps – abundantly, and without any input from us!) Think of zone 4 as your foraging area.
Zone 5 would be for completely (or almost completely) unmanaged areas – like if you had a lot of acreage that included a wooded area.
The general idea behind zones, is to be thoughtful and intentional about where you place elements of your garden. By doing so, you will make it far easier to manage, maintain, and ultimately, harvest those crops.
Here are some practical ways you can incorporate permaculture design into your garden, to help save you some work:
- keep the gardens that need the most attention close to your house. You shouldn’t need to even put shoes on to go snip some lettuce for dinner, or grab a handful of basil.
- keep a full watering can next to any plants you have on your patio/deck, along with a small pair of scissors for pruning/harvesting
- mulch as much as possible (Nature doesn’t like bare soil, and neither should you. Nature will fill bare soil with weeds).
- Sun and your water source are the 2 most important things when it comes to gardening. That area of your property might have full sun early in the spring before the trees are leafed out, but be in shade most of the day later in the summer. Choose wisely! Can your water hose reach your garden? (If not, it’s probably too far away). But if you really can’t put your garden close enough to reach with a hose, can you install rain barrels? Can you pump water from a nearby source (like a pond, or a lake?). You don’t want to be lugging jugs of water every time you need to water your garden.
- Do not till. Tilling just brings all those once-dormant weed seeds to the surface, and then when you water your garden, you will be inundated with weeds. Instead, lay cardboard directly over the grass (this will kill the grass and suppress all that weed seed, then will eventually break down into compost and invite tons of happy worms to your garden), then either build raised beds on top of the cardboard, or layer compost and mulch, and plant directly in that.
Putting some time into planning your gardens with permaculture principles in mind, will save you a lot of overwhelm in the long run!
13. Have Separate Garden Areas
I think many of us grew up seeing ‘traditional gardens’ – where a huge plot of land was tilled up, and one massive garden was used to grow everything.
Maintaining a garden of that size can feel completely overwhelming – once the weeds start to take over, it feels pointless to even try to keep up.
I’m a big fan of having smaller, separate garden areas, and fitting them into our landscape.
I also like to separate annuals from perennials. The perennial gardens tend to need less maintenance, since the plants grow back each year on their own – so other than weeding, harvesting, and topping up mulch, they don’t need a ton of work.
I have a few different gardens:
Culinary Herb Garden
Our culinary herb garden was an old, overgrown flowerbed at the back of our house. Over time, I slowly dug out the existing plants, and replaced them with herbs.
Having the herb garden right next to the house is ideal, since I can run out and snip some fresh herbs while cooking.
Herbs will thrive in shade, so having it at the back of our house is a good use of space, since not many other plants will grow there. Plus, it’s just a few steps away from my kitchen door.
Medicinal Herb Garden
Originally, I had my medicinal herbs mixed in with our culinary herbs. But I didn’t realize how large medicinal herbs grow, and I realized they would need their own space. Medicinal herbs are generally grown for their flowers and often prefer full sun. So we created a separate garden just for our medicinal herbs.
Our medicinal herb garden is right at the bottom of our deck stairs, and I can see it from my kitchen window.
Kitchen Garden
Our Kitchen Garden is where all our annual veggies grow. These are all grown in raised beds, and are also pretty close to the house, making it easy to run out and snip some lettuce for a salad, or grab a tomato.
Food Forest
Our food forest is our perennial food garden. This is where our fruit trees and shrubs live, along with any perennial veggies (rhubarb, asparagus, horse radish, Egyptian walking onions, etc).
Creating smaller, separate gardens feels much more manageable, as you can just focus on one at a time.
14. Break Your Garden Into Zones
The nice thing about having separate garden areas, is it makes it easy to divide your gardening tasks into zones.
(If you google gardening zones, you’ll get lots of results for hardiness zones! That’s not what we’re talking about here…)
Also, not to be confused with the Permaculture Zones I mentioned above. These gardening zones are just what I use to break up my gardening tasks into smaller, more manageable areas.
Having multiple smaller gardens, rather than one huge plot, makes this easy.
Rather than looking at a huge garden plot and being completely overwhelmed, you simply focus on one zone per day or per week.
There is no way I can get to all the gardens every day, so choosing an area to work on each day or even each week, makes it feel less overwhelming.
There are a couple of ways you can do this, depending on how big your property is, and how many gardens you have to take care of:
One Zone Per Day
The benefit of working in a different zone each day, is that no area goes more than a week without being ‘touched’. I might not get to ‘everything’ in that zone that day, but each week, the most important things get done, and nothing gets too out of control.
I tend to switch to one zone per day once all the major initial tasks have been done, and I’m in maintenance mode.
Obviously weather is a factor, so sometimes things need to get shifted around, but overall, I enjoy only having to focus on one area each day.
My zones include not just the gardens, but any outdoor spaces I’m responsible for maintaining (I’m super lucky that my husband and teenaged boys take care of all the lawn maintenance!)
Monday: Deck, stairs, and medicinal herb garden
Tuesday: Patio & culinary herb garden
Wednesday: Kitchen garden
Thursday: Food forest
Friday: Flower beds & front porch
Saturday: Bunkie area

One Zone Per Week
The other option is to do whatever needs to be done daily each day (ie – watering, harvesting), but then choose a different area to focus on each week.
I tend to do a zone per week at the beginning of gardening season. The reason is that in the initial time of getting gardens set up, there is a ton of work, and if I jumped from one zone to the next each day, nothing would get completed.
If, instead, I focus on one area for the whole week, I can get a lot done: weeding, prepping beds, getting everything planted, etc – then I can move on to the next area.
After I’ve done all this, then switching to daily zones makes it easy to maintain.
Week 1: Deck, stairs, and medicinal herb garden
Week 2: Patio & culinary herb garden
Week 3: Kitchen garden
Week 4: Food forest
Week 5: Flower beds & front porch
Week 6: Bunkie area
You could use the weekly zones first thing in the spring to get all your gardens prepared, then switch to the daily zones for the rest of the summer.
Daily Tasks vs. Zone Tasks
Just like with inside your home, your gardening tasks can be divided into daily tasks, and “zone” tasks.
Daily Gardening Tasks
There are some things you’ll need to tend to daily, regardless of what zone you’re working in that day or week. That perfect-sized zucchini is not going to wait until you get around to it, unless you enjoy zucchini the size of baseball bats. 🙂
Similar to how I divide my homemaking chores, the things on my daily list are things that must get done each day (ie – making the bed, keeping things picked up, washing dishes & wiping down counters), and things that could get done weekly, but are too overwhelming when they pile up, so I do them daily instead (ie – a load of laundry from start to finish each day).
- Watering (you don’t have to water everything every day, but check what needs watering, and do it)
- Harvesting – believe it or not, the whole point to growing food is to actually harvest and eat it! I add “harvesting” to my daily checklist, so I remember to see what is ready to be eaten, and bring it inside
- “Feed scraps to chickens” is on my daily list. If anything has bolted, or if I’ve harvested, say, carrots or radishes, the tops go to the chickens. This is my reminder to not leave them lying on the ground to wilt and die. (The scraps, not the chickens… ahem).
Weekly Gardening Tasks
This is where your garden zones come in!
While you’re working in that zone (whether you choose one zone per day, or one per week), you would do things like:
- weeding
- planting or re-planting
- thinning
- mulching
- sweeping/washing (if you have pathways etc)
15. Use Checklists
I have always found that checklists help keep me on track, and also help reduce the overwhelm.
Instead of having all my to-dos swirling around in my head, paralyzingly me, as soon as I think of a gardening task that needs to get done, it goes on my list. I feel so much less overwhelmed when I’m not trying to store all those tasks in my brain.
I use Trello to organize everything in my life, including gardening.
I have a daily checklist of gardening tasks that need to get done every day, and then I have a separate checklist for each gardening zone.
Daily Gardening Checklist

Zone Tasks
These are the tasks I do while I’m working in that zone.
Whenever a job that needs to be done pops into my head, instead of going and doing it immediately, I add it to my list for that zone. Since I know I will eventually get around to it, it no longer stresses me out, and I can get back to whatever I’m supposed to be focusing on.

A peek inside one of my Zone Cards:

One Time vs. Weekly Tasks
You’ll notice I have my checklist divided between one time tasks & weekly tasks.
That’s because some of my zone tasks need to be done every week, while others only need to be done once. I find it helpful to separate recurring from one-time tasks.
The recurring tasks I do every week, but with the one-time tasks, I just go down the list and check off whichever ones I get done.
I keep this list on my Garden Planning Trello Board.
I have the Trello app on all my devices (laptop, iPad, and iPhone), so it’s quick and easy for me to add a new task when I think of it.

Using checklists also helps me to stay focused, so I don’t jump from one task to the next, without actually finishing anything!
Without lists, my gardening time would look a little something like this:
>Working on weeding one raised bed
>Remember that I should harvest the asparagus before it gets to tall, so I go do that so I won’t forget
>While harvesting the asparagus, I see that the strawberry patch needs weeding
>I see the rake I left out, I should put that away before it rains
>While I’m putting the rake away, I see that the shed could use some tidying up… (you see where this is going!)
This is how I would get exactly nothing done if I let my brain be in charge! Instead, my list is in charge.
Gardening Without Overwhelm
Even if you don’t have ADHD, I’m sure all of us feel overwhelmed from time to time. I hope some of these tips will help you be more productive, and get you out working in your garden (even when you don’t feel like it).
Almost 100% of the time, no matter how much I procrastinate on a gardening task, once I get out there and start doing it, I love it. It’s just getting over the mental hurdle of starting that causes me grief.
If you’ve implemented any of these tips, or have any of your own to share, I’d love if you’d let me know in the comments!
Pin It for Later

Other Gardening Posts
Here are some other gardening posts you might enjoy:
Gardening Resources
Here are some gardening resources you may find helpful: