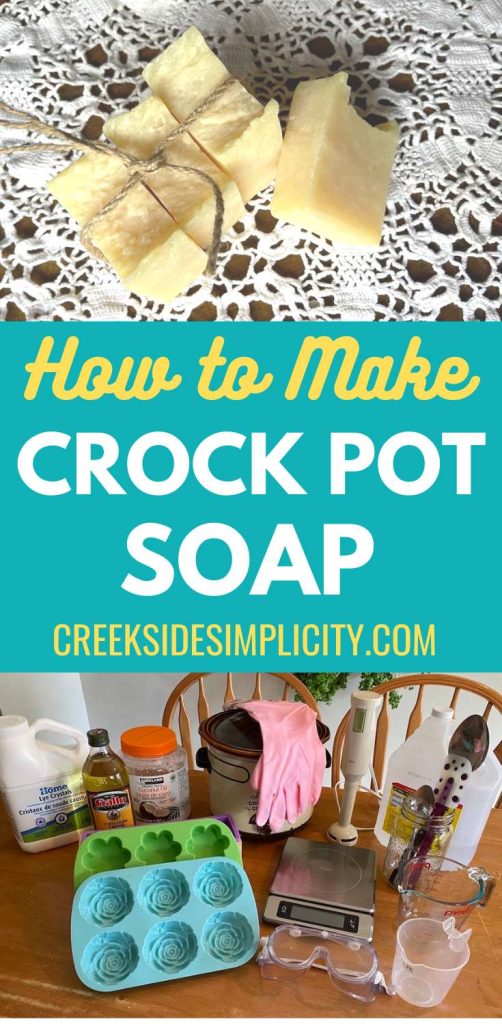
Hot Process Crock Pot Soap for Beginners
This is a simple, homestead soap that you can make in your crock pot. It uses basic ingredients, and is perfect for beginners.
Why Make Your Own Soap?
Why would you make your own soap, when you can buy it readily at the store?
Most of the soaps you buy at the store are not actually soap. At least not in the traditional sense. They are usually detergents, made of synthetic ingredients, which strip the moisture from your skin, and allow those same companies to market their synthetic moisturizers to you. 🙂
Many of those ingredients are toxic, and can cause harm to our bodies.
REAL soap is just fat, liquid, and lye. It can contain optional ingredients like essential oils, or infused herbs, or things like shea butter or cocoa butter for extra moisturizing properties – but fundamentally, real soap is just fat, liquid, lye.
When I began transitioning to a toxin-free home nearly 20 years ago, I eliminated all of those detergents from my home and started purchasing REAL soap – mostly from farmer’s markets and local artisans. However, buying soap this way is very costly. At the time I was paying $5+ per bar of soap – which is a bargain when you consider the time and effort someone went to to make that soap. (They go for much more now). However, I was looking for a more cost-effective way to have high-quality soap, and as usual, I decided to go the DIY route.
Reasons to make your own soap:
- Saves money
- You have control over the ingredients
- Makes you feel like a pioneer
- Makes great gifts
- The satisfaction of saying you make your own soap!
Isn’t Lye Dangerous?
Most people are nervous of soapmaking when they learn they will have to use lye. I was no exception! I researched this to DEATH because I was so terrified of lye. I watched approximately one million YouTube videos. I even researched to see if there was a way to make soap without lye. (Spoiler alert: there isn’t. While you can play with things like melt-and-pour soap, you’re really just melting down soap that someone else has already made… with lye. Without lye, soap is just fat. Lye is what turns the fat into soap).
What I came to realize is that as long as I followed a few basic safety precautions, working with lye isn’t that terrifying. Here are some of the safety precautions I follow:
- Keep children and pets out of the room while you’re making soap
- Mix your lye outdoors or in a well-ventilated area
- Wear long rubber gloves and safety goggles at all times when working with lye
- Keep vinegar nearby (vinegar neutralizes lye in the unlikely event that you splash some on your skin)
- RESPECT the lye. Be cautious when using it. Don’t spill it. Don’t be distracted while using it.
That’s basically it.
I fully believe that every homemaker can embrace soapmaking, and that includes learning how to work with lye.
History of Soap Making
About 5,000 years ago, in ancient Babylonia, it was discovered that mixing animal fats with wood ash produced a cleansing substance.
Soap was initially used for cleaning textiles, then became popular during the Roman Empire.
Due to a better understanding of the relationship between cleanliness and health, commercial soaps became available toward the end of the 18th century.
Soapmaking was a yearly or semi-annual event on the homesteads of early settlers.
Traditionally, soap was always made in the late autumn, after the family’s hogs had been butchered. This provided a ready supply of lard for soap making.
Why Hot Process Soap?
If you’re new to soap making, you might have heard the terms ‘hot process’ and ‘cold process’ thrown around. What is the difference, and why choose the hot process method?
Cold process soap making does not involve heat. You simply mix your fats with your lye and it creates soap. It’s faster than hot process, because you eliminate the cooking time. It usually makes a smoother, prettier soap. (Most of the fancy artisan soaps you can purchase are cold process soaps).
So if cold process soapmaking is faster and easier, then why choose hot process? I’ll share some of my favourite reasons for making hot process soap.
1. Hot process soap is more traditional. Back in the pioneer days, you would have seen women stirring their soap in a big pot over an open fire. There was no cold process soap back in the day, soap was made by cooking it.
2. Hot process soap is usable right away. Unlike cold process soap, which requires 4-6 weeks of cure time before it can be used, hot process soap can be used immediately, as the saponification process is sped up by cooking. Although it does benefit from curing for 1-2 weeks so that it has an opportunity to fully harden, it is perfectly safe to use right away.
3. Hot process soap means easier clean up. Since hot process soap speeds up the saponification process, when you’re finished making your soap, you have…. soap. That means what’s on your soapmaking equipment is just soap that can be washed with plain water. With cold process soap, the lye is still active, which means you have to be careful during clean up to not get any of the residue on your skin, and you will want to wash all your supplies with vinegar to neutralize any active lye that might be remaining on them.
4. Since hot process soap is fully saponified, you don’t have to worry about it causing harm to anyone while it cures. With cold process soap, while it’s curing you want to make sure it is not accessible to children or pets, as it could still contain active lye. This could be challenging if you have a large amount of soap to cure.
5. Cold process soap requires you to be much more precise with temperatures. Everything has to be a certain temperature before you can mix it together. With hot process soap, I don’t even use a thermometer.
Hot process vs. cold process really comes down to personal preference, but I’ve been making hot process soap for the past 8 years and truly love it. I love that I can use it right away, and that clean up is a snap. It may not be as smooth or pretty as cold process soap, but it does the job just fine.
This post may contain affiliate links, which means if you make a purchase through one of these links, I make a small amount of commission at no extra cost to you. See full disclosure here.
Essential Oils vs. Fragrance Oils
If you’re interested in making your own soap at home, I am also assuming it’s partially because you’re interested in living a simpler, less toxic life. If that’s the case, you’ll want to understand the difference between fragrance oils and essential oils.
First, let me start by saying that scenting your soap is COMPLETELY optional. I don’t always scent my soap, I sometimes just make it plain. Unscented soap is functional just the way it is.
However, part of the reason I began making my own soap (aside from saving money), is that many artisan soap makers use cheap fragrance oils to scent their soaps, or low-quality ‘essential oils’ which are really just fragrance oils disguised as essential oils.
The simple reason for this is that you get what you pay for, and high quality essential oils cost more. Fragrance oils and low quality essential oils are cheap, and since you need a fairly significant amount to have a noticeable scent in your soap, then it’s understandable why someone who is selling soap would opt for the more budget-friendly option. Otherwise they would have to drastically increase the price of their soap. (This, right here, is why I don’t sell my soap).
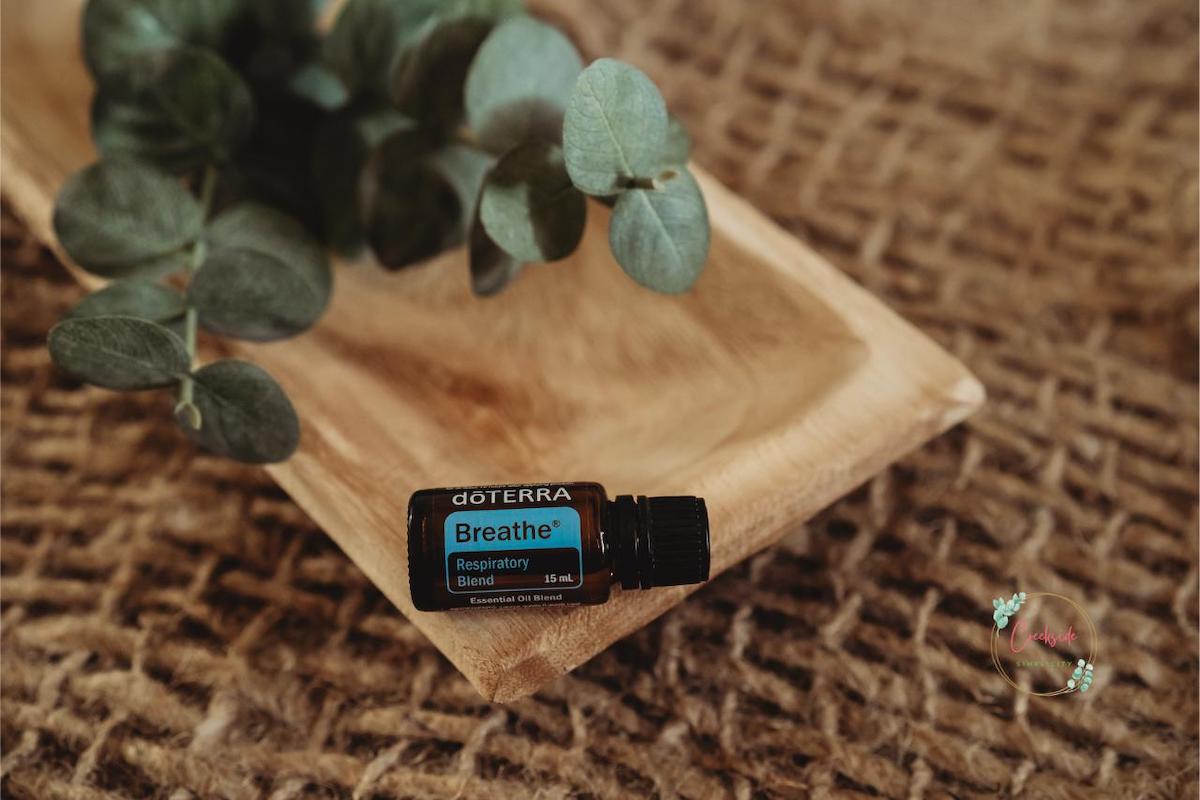
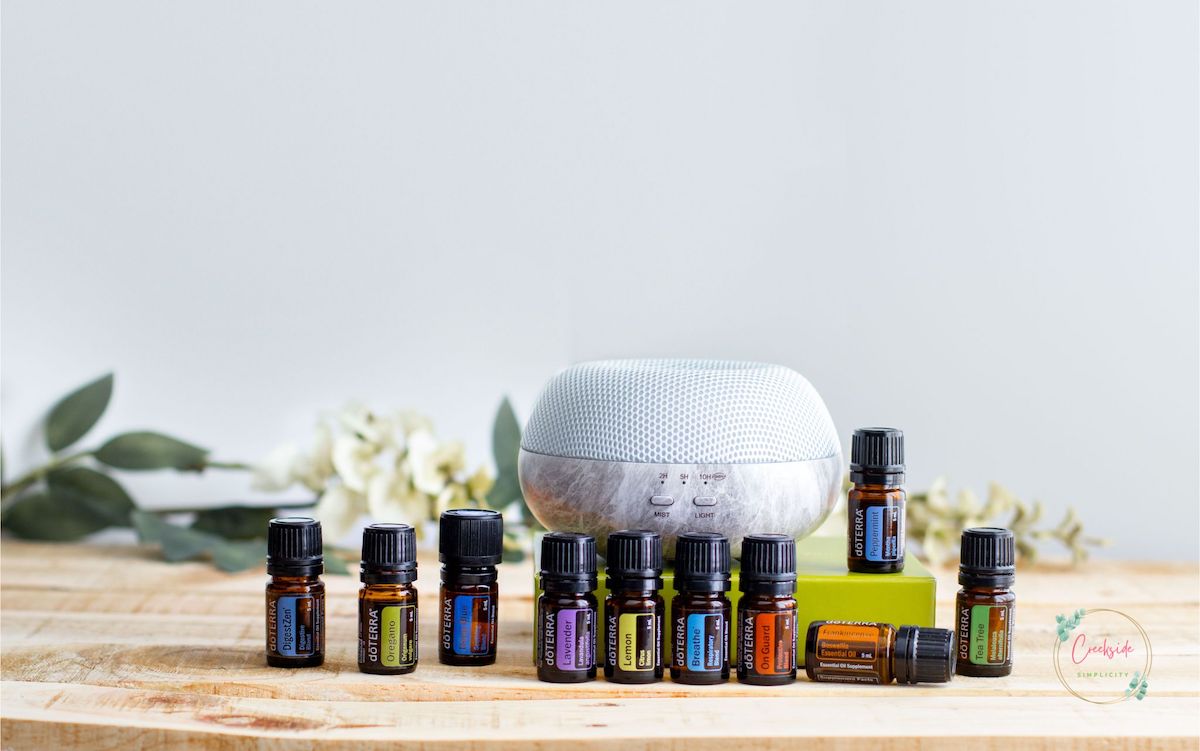
If you already have essential oils at home, then certainly use what you have. If you’re looking to purchase some, then this is the brand I recommend. I’ve been using these essential oils for over 10 years due to their quality and purity, and wouldn’t recommend anything else.
Unlike fragrance oils and low quality essential oils, high quality essential oils actually have therapeutic benefits. So they aren’t just for scent, but also for the aromatherapy you receive when using them.
Here are some of my favourite essential oil combinations for soap:
- Rosemary & Lavender
- Holiday Joy (a blend) & Peppermint
- Cedarwood & Patchouli
If you’re new to essential oils, you can check out my Beginner’s Guide to Essential Oils.
Note that citrus essential oils evaporate more quickly than other essential oils, so you will end up needing to use more to get enough scent.
Don’t go crazy with any ‘minty’ oils – such as peppermint, spearmint etc., as they can be a bit tingly on private parts. 😉 Some people don’t mind that, but others find it uncomfortable.
Supplies Needed for Crock Pot Soap
You will need a few items to begin your soapmaking journey. I do recommend having separate equipment for soapmaking. Since you will be working with lye, you really don’t want to mingle your soapmaking supplies with your regular cooking supplies. I keep all of my soapmaking stuff in a tote in the garage. Then when it’s time to make a batch of soap, I just grab my tote and bring it into the kitchen.
You can acquire most of these items very inexpensively if you shop second hand. Keep an eye out at thrift stores, yard sales, or Facebook Marketplace to find what you need. But for convenience, I’ll also provide Amazon links to recommended items.
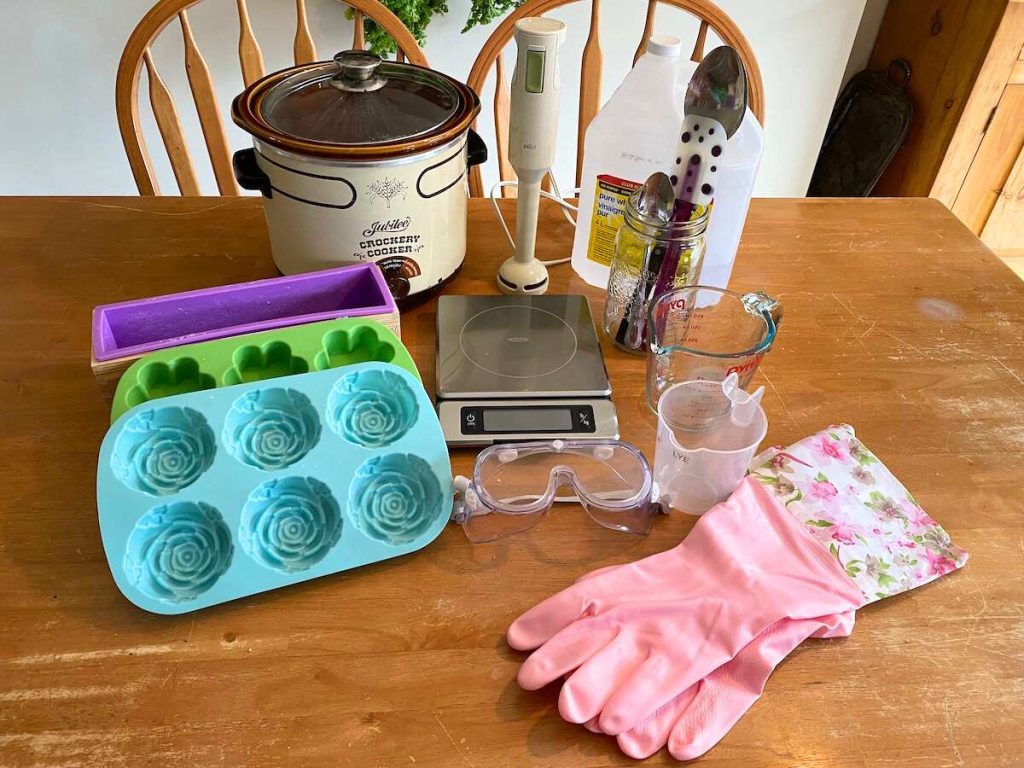
- Crock Pot/Slow Cooker –You’ll want to make sure your slow cooker is a decent size – I’d say a minimum of 4 quarts. I prefer the more upright style, versus the oval style. Your ingredients may not look like much when you put them in, but as they expand they can easily overflow your slow cooker if you don’t keep an eye on it. So make sure your slow cooker isn’t too small.
- Stick Blender/Immersion Blender –Back in the day, people had to stir their soap for a LONG time to get it to reach trace. That process is sped up considerably with the use of a stick blender! I found mine second hand at a thrift shop.
- Digital scale – The one thing you may not be able to find second hand is a digital scale. A digital scale is a must for soapmaking, because you will be measuring all your ingredients by weight. (I tried and returned multiple different digital scales, and this OXO digital scale was by far the best!).
- Metal spoon for stirring lye – Just a basic Tablespoon sized metal kitchen spoon will work fine for this. You may wish to have one that you only use for this purpose, so check thrift stores.
- Large metal or wooden spoon for stirring soap – Any large metal or wooden spoon would work for this. I found one at a thrift store.
- Silicone Spatula – This is optional, but I find a silicone spatula is helpful for scraping the last bits of soap out of the crock pot, and for smoothing the top of the soap once it’s in the molds.
- Quart sized wide mouth mason jar for mixing lye –I find a quart sized mason jar works well for mixing lye. You don’t want to use plastic for this, as the lye solution gets extremely hot.
- 2 cup Glass measuring cup for weighing oils – This doesn’t have to be a measuring cup since you will be weighing the oils and don’t need the measurements, but I find these glass measuring cups are convenient to use because they have a pour spout on them.
- Plastic cup for weighing lye – Again, this doesn’t have to be a measuring cup since you’ll be going by weight, but I find the spout convenient for pouring. I have labelled this cup ‘lye’ so I know not to use it for anything else.
- Safety goggles –You’ll want to wear safety goggles at all times while working with lye. They may not look pretty but you definitely don’t want to risk accidentally splashing lye in your eye.
- Rubber gloves –Long rubber gloves are ideal when working with lye. This will help protect your forearms from any accidental touches or splashes.
- Vinegar – Vinegar is your friend when it comes to working with lye. Vinegar neutralizes lye. So if you spill any lye on a surface, or get any on your skin, just wipe it off with some vinegar. (I keep a roll of paper towel handy too).
- Molds –Molds can be as simple or as fancy as you want them to be. I like to use silicone molds. But you can also root through your recycling bin and see what you can find! You can use almost anything as a soap mold. Empty milk cartons are a great choice because they already have a plastic lining inside, making the soap easy to release from the mold (plus you can just cut it away!).
Plastic or paper cups, muffin tins (with paper cupcake liners), or even old Tupperware will work. Use your imagination! I used what I had around the house until I was certain that soapmaking was something I would be doing on a regular basis, before investing in molds.
Ingredients for Hot Process Crock Pot Soap
As this is a very basic soap recipe, there aren’t many ingredients! However, you do need to follow the recipe exactly. If you wish to make any changes to the recipe (using different types of oils/fats, or changing the quantity), you will need to use a lye calculator to recalculate your lye.
Soapmaking requires very precise measurements (hence the use of the digital scale). So the ingredients below are based on following the recipe exactly.
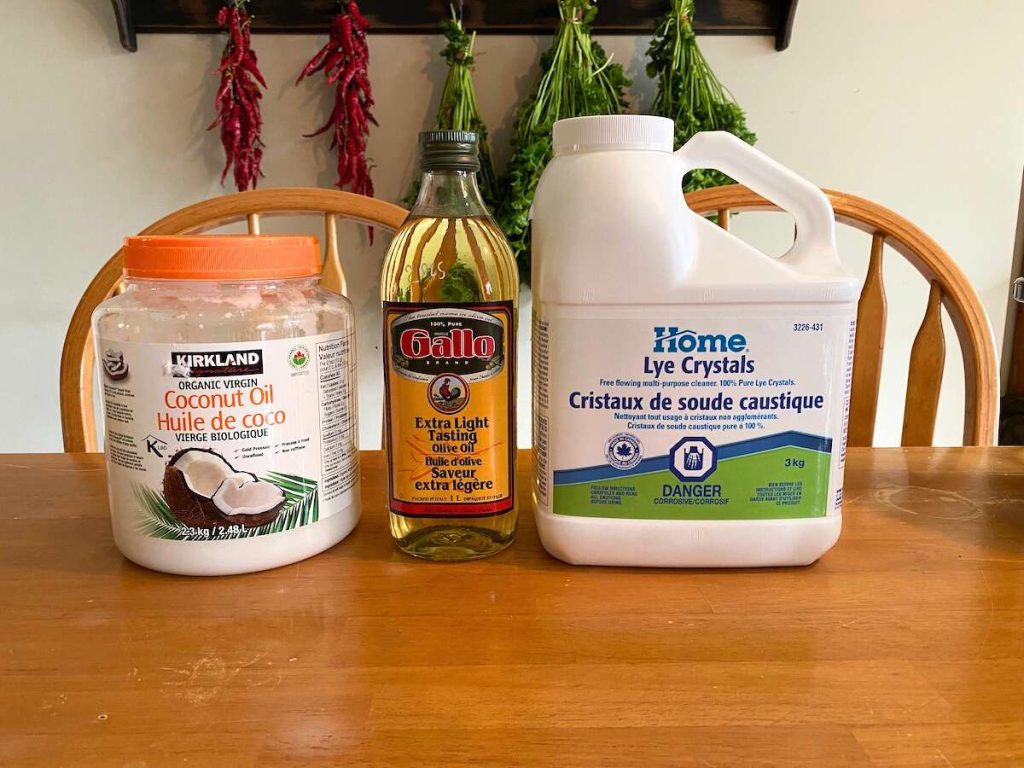
Coconut oil (16 oz/ 435.59 g)
Olive oil (16 oz/ 453.39 g) (I like to use light olive oil, as regular olive oil can tinge your soap green – nothing wrong with that if you don’t mind green soap!)
Water (10.71 oz/ 303.54 g)
Lye (4.79 oz/ 135.74 g) – I get this at our local hardware store. You may have to ask for it.
Optional:
Essential Oils (1 oz/ 28.35 g)
How to Make Hot Process Soap in a Crock Pot
And now for what you’re here for: how to make handmade soap in a crock pot!
Here are the steps for hot process soap making:
1. Prepare your supplies
Have a clean and clear work area, and lay out your supplies. I like to use my kitchen table. You’ll need a space where you have access to a plug for your crock pot and your immersion blender. You may need an extension cord depending on how short your cords are and how far away your plugs are.
Plug in your slow cooker and turn it on low.
Prepare your molds.
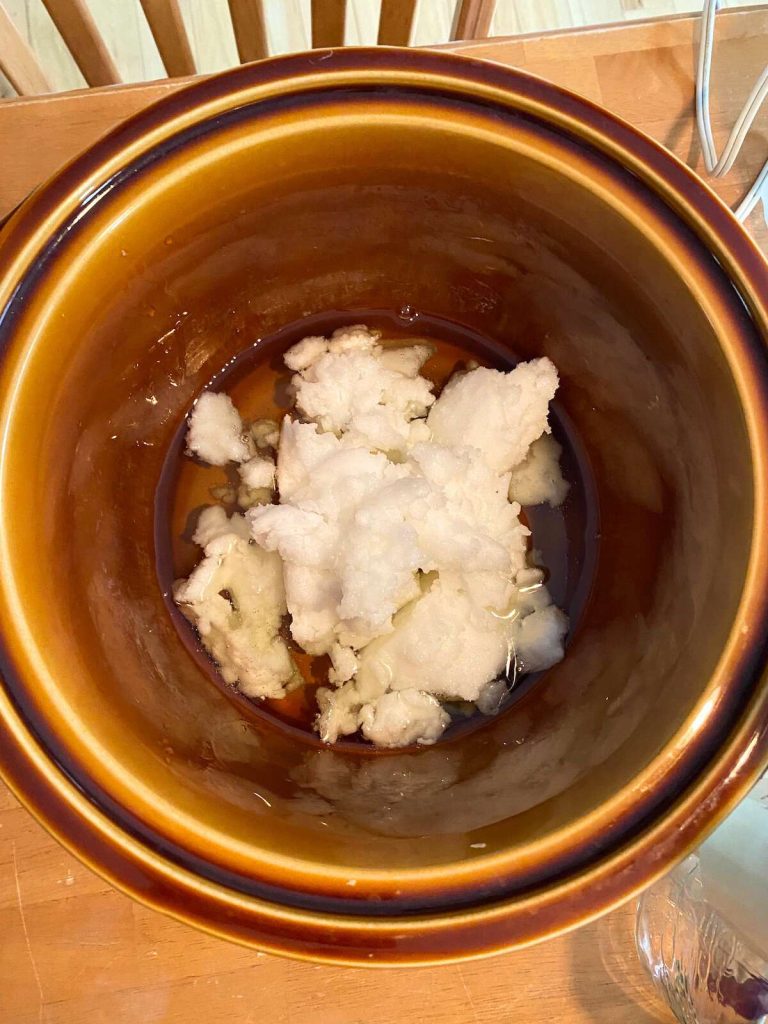
2. Weigh & Begin Melting Your Oils

Place your glass measuring cup on your digital scale, and hit the tare button. (This is so you don’t include the weight of the measuring cup). Your scale should now read zero. Now pour in the amount of olive oil specified in the recipe. Transfer to your slow cooker.
Next, place the glass measuring cup back on the scale and hit tare again. Now add your coconut oil. If your coconut oil is solid, you won’t be pouring it, but scooping it. Once you have the correct amount, add that to your crock pot as well. Allow the oils to melt and mix together while you move onto the next step.
3. Weigh & Mix Your Water & Lye
If you haven’t already, here is where you will want to put your gloves and safety goggles on.
Next, you want to weigh and mix your lye. Begin by weighing your water.
Place your glass mason jar on the scale and hit tare. Now slowly pour tap water into the jar until you reach the correct weight. If you pour too fast, you may end up having to pour some out.
Once you have the correct amount of water, remove it from the scale and set it aside.
Next, place your lye cup on the scale and press tare. Slowly and carefully, pour your lye into the cup until the correct weight is reached. If you over-pour, use a spoon to remove the excess and put it back in your lye container. Make sure the spoon is perfectly dry as you don’t want to accidentally activate the lye.
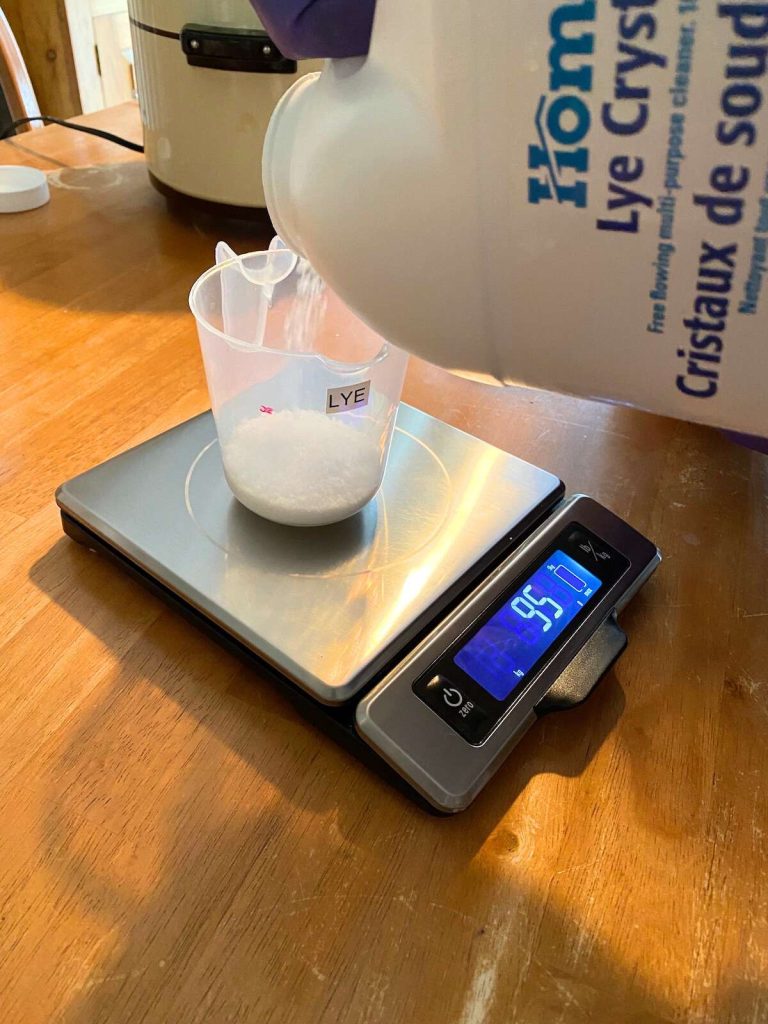
This is the part I do outside. The fumes from lye are caustic, so you want to be careful NOT to have your face over the jar while you’re mixing. It will literally take your breath away.
I carefully carry the jar of water, the cup of lye, and my metal spoon outside to my patio table to do this part.
Set the jar of water down on the table. Hold the spoon in one hand, the cup of lye in the other hand, and SLOWLY pour the lye into the water while mixing it with the spoon. Do NOT breathe this in. Continue pouring and mixing until you have used all the lye.

You will notice the mixture gets cloudy and HOT.
Leave the mixture to sit outside to cool for 10 minutes. (I set a timer).
4. Pour your activated lye into the crock pot
After 10 minutes, your lye solution should have cooled somewhat and become clear, and your oils should be warmed up in the crock pot.
You can now pour your activated lye into the crock pot. Again, making sure you have your rubber gloves and safety goggles on, and do not breathe in the fumes as you pour the lye into the slow cooker.

Slowly pour the lye mixture into the crock pot, stirring with your large metal or wooden spoon.
This would be a good time to rinse out your lye jar in the sink with some vinegar. Again, vinegar neutralizes lye.
5. Begin Blending Your Soap
(You still want your safety gear on for this step – your mixture hasn’t saponified yet, so you could end up splashing some active lye).
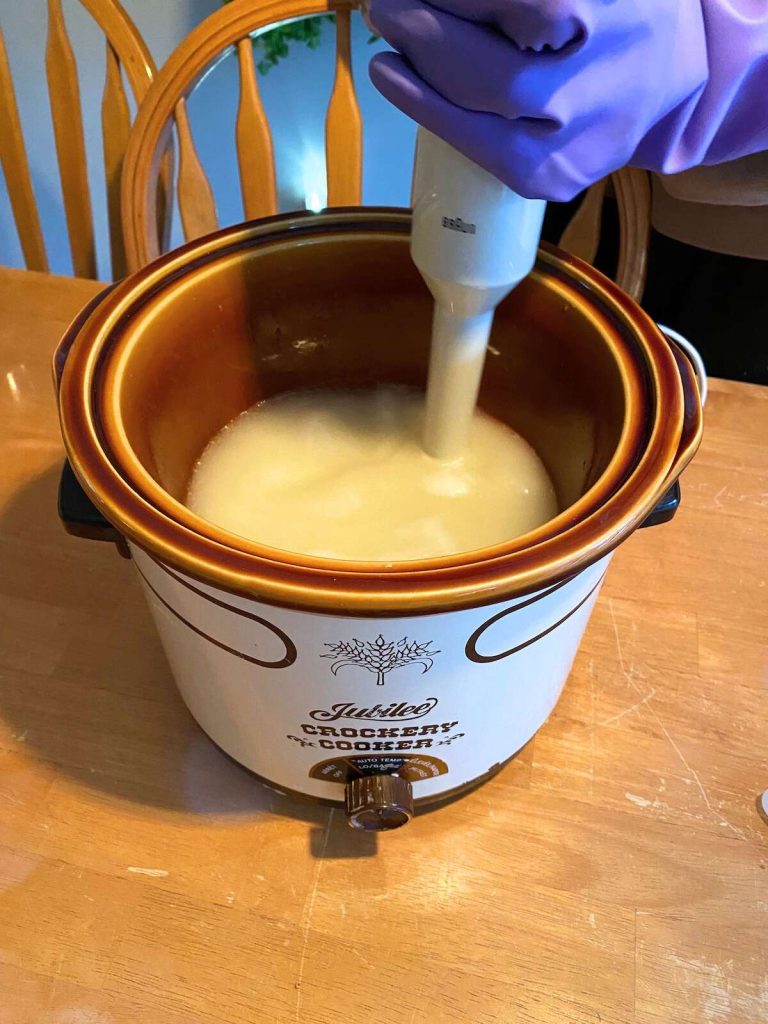
Now come back to your crock pot, and with your immersion blender, blend your soap for 4-5 minutes until it reaches a soft pudding-like consistency. You’re looking for something called ‘trace’, which is basically where you’ll see a trail for a second or two where you have moved your immersion blender. If the trail fills in immediately, then you haven’t yet reached trace. Watch for it to take a couple of seconds.

Once your soap has reached trace, you can stop blending. Put the lid on your soap and let it ‘cook’ for awhile. You’ll want to keep an eye on it, because as it cooks, it will get foamy and rise up. You don’t want it spilling out of your slow cooker. When you see it getting close to reaching the lid, you’ll want to stir it down with your spoon. You should only need to do this once or twice.
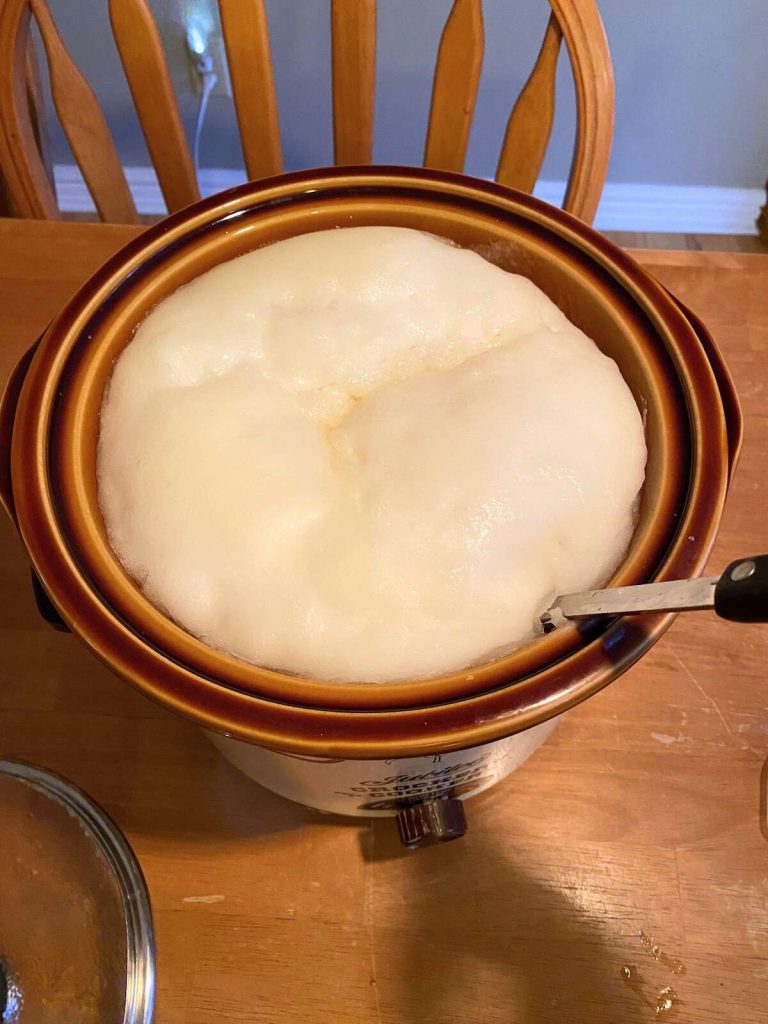
After about 45 minutes, your soap should be fully ‘cooked’. Turn off your slow cooker.
6. Add Fragrance (Optional)

This step is completely optional, but this is where you add your fragrance. Since essential oils are volatile (they evaporate quickly with heat), you want this to be the very last step before transferring the soap to your molds. You want to avoid heating your essential oils as much as possible.
Pour in your essential oils and give it a gentle stir to mix it in with the soap.
6. Transfer Your Soap to Molds
Once your soap is cooked, you can now transfer it to your molds. If using silicone molds, you may find it helpful to place them on a cookie sheet before filling them. This way you can move them out of the way while you’re letting them cool. (If you don’t put them on anything, you won’t be able to pick them up to move them).
I use the large spoon to scoop it into the molds, and then I pick up the molds and drop them on the table a few times to release any air bubbles. Then top them off with more soap, and repeat dropping the mold.
You can use your silicone spatula to scrape out any remaining soap from the slow cooker to your molds. You can also use the spatula to smooth out the soap on top of the molds.
7. Let Soap Cool for 24 Hours
Allow your soap to cool in the molds for 24 hours. This way they will be fully set, and you won’t damage them when removing them from the molds.
8. Unmold the Soap and Place on a Wire Rack
After 24 hours, your finished soap is ready to unmold. Carefully remove the soap from the molds (This is easy with the silicone molds, as you just push them inside out).
If your’e using a milk carton, cut away the carton from the soap.
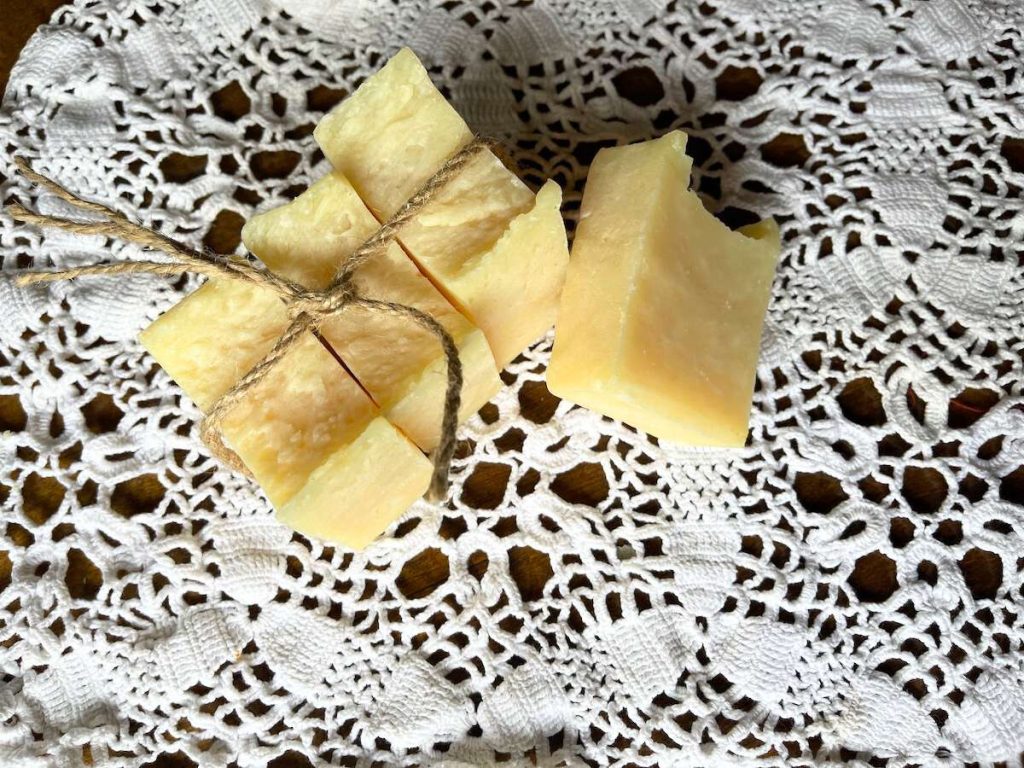
If you’re using tupperware, or a loaf mold, this is when you’ll want to cut the soap into your preferred bar sizes. Simply place the block of soap on a cutting board, and use a knife or a soap cutter to cut it into pieces. I like a good sized bar of soap in the shower, so I cut mine about 1″ thick.
After your soap has been unmolded, and cut if needed, you’ll want to store it in a way that it will have plenty of air circulation to allow it to fully cure.
While hot process soap can be used immediately, the benefit of the curing time is that it has time to harden. Harder soap lasts longer because it doesn’t melt as easily under water.
I use my seed starting shelf to cure my soap, as I generally make soap in the fall/winter months and my seed starting shelf isn’t being used. But a wire baking rack will also work. Just leave a bit of space between each bar. Standing your bars up vertically allows you to fit more in less space.
After 1-2 weeks, your soap is ready to use, or to give as gifts!
Clean Up Tips
Since we are making hot process soap, clean up is a breeze. I just put all my tools inside the crock pot, fill it up with hot water, and let it sit overnight. By morning it should all be clean. To be extra cautious, you could also give everything a quick rinse with vinegar before storing it away. This will ensure that any trace amounts of lye have been neutralized.
You Made Your Own Soap!
Congratulations on making your very own homemade soap! I hope you feel empowered now to continue doing this moving forward.
You could make a batch a few times a year as your family runs low.
What I like to do is make several batches at once. I generally make about 100 bars of soap per year, so while I have the equipment out, I make a batch per day for a few days in a row (I need to wait the 24 hours between batches as my molds are in use). Then once I’ve completed my soap making for the year, I can pack away all my equipment until the following year.
Handmade soap makes a wonderful gift – I find it’s something people really appreciate, and EVERYONE uses soap. 🙂
Other Posts You Might Like
Homemade Cleaning Recipes
Homemade Toothpaste
All Purpose Cleaning Spray
Pin It for Later
Hot Process Crock Pot Soap for Beginners

This is a simple, homestead soap that you can make in your crock pot. It uses basic ingredients, and is perfect for beginners.
Materials
- Light Olive Oil 16 oz/435.59 g
- Coconut Oil 16 oz/435.59 g
- Lye 4.79 oz/ 135.74 g
- Water 10.71 oz/ 303.54 g
Tools
- Crock Pot
- Immersion blender
- Digital Scale
- Large metal spoon
- Metal table spoon
- 2 cup glass measuring cup
- Plastic measuring cup
- Quart sized, wide mouth mason jar
- Rubber spatula
- Soap molds
- Safety goggles
- Long rubber gloves
- Vinegar
Instructions
- Lay out all of your supplies in your work area, plug in your immersion blender and crock pot, and turn it on low.
- Place your glass measuring cup on your scale, hit tare, and pour in your olive oil. Now pour it into the crock pot.
- Place your glass measuring cup back on the scale, hit tare again, and measure out your coconut oil. Add this to the crock pot and let it begin melting.
- Tare your plastic lye cup and weigh out your lye.
- Tare your mason jar and add your water.
- Carefully pour your lye into the mason jar of water, stirring as you go. Let the mixture sit for 10 minutes as it cools and clears up.
- When your fats are melted, pour your lye mixture into the crock pot and give it a stir with your large spoon.
- Using your immersion blender, blend until your soap reaches trace (looks like pudding - blender will leave a 'trail' that takes a few seconds to fill in).
- Once trace is reached, put the lid on and cook your soap for 45 minutes. Keep an eye on it, as it rises you will need to stir it down so it doesn't overflow. You should only need to do this once or twice.
- After 45 minutes, turn off the crock pot, add in your essential oils (optional), and give it a final stir.
- Scoop your soap into your molds, using your spatula, if needed, to scrape out any remaining soap in the crock pot.
- Let your soap cool over night. The next day, unmold it and cut it if needed (depending on what type of molds you used).
- Your soap can be used immediately, but I suggest letting it cure on wire racks for 1-2 weeks to allow it to harden.